Create Revit slatted ceiling systems with openings

This is easy to do for 1 space but will quickly slow Revit down when done for lots of rooms in large project models. If you use less efficient methods, Revit will treat each slat as an individual element which calls a dedicated Revit process every time it is drawn or re-generated. Thus, you’ll need the right method to prevents this situation and make best use of your workstation’s computing power.
- In-place components: is the worst method. Not only does this force Revit to process each slat individually, it opens the door to potential errors and accidental changes to slats’ geometry.
- Railing: A bit more efficient, but does not let you create openings on the slat system for things like columns or lighting fixtures. It’s also weird to model your ceiling as a railing!
- Massing & curtain panels pattern-based: Can give any desired shape and size, but is overkill for this task and will crave for ever more computing resources. Element category will also be wrong.
- Externally loaded families: Seem unintuitive at first because we need the ceiling system to adapt to many different room shapes and ceiling fixture sizes & positions. However, a bit of advanced family editing techniques will prove this method is the most efficient.
Therefore, we will show you today how to create a slat ceiling system using a loaded Revit family. It will be fully parametric and can work with rooms of any sizes and shapes.
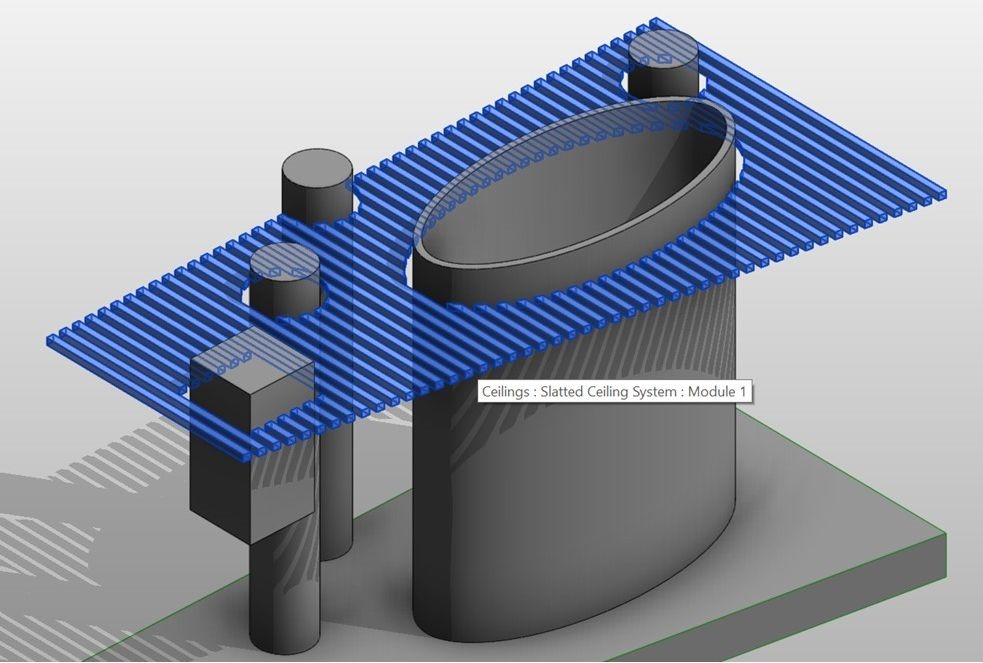
Expected output


Our slatted ceiling family will deliver key advantages:
| Category | Ceilings. Your ceiling-based families will love it! |
| Available parameters |
Grouped logically and can be renamed, these parameters will allow you to have multiple size variations with the same family. |
| File size | At only 308 Kb, this will make large models much more tolerable! |
| Family & Type names | Generic, can be renamed to suit your company’s standards. |
| Level of detail |
|
| Others | Has no redundant constraints, construction geometries or subcategories. Easily upgradeable to Revit 2013 and later. |

Or, follow steps below to make one yourself. You will need intermediate-level Revit knowledge.

Click above to learn from our free YouTube training channel!
Step 1 – Create a parametric slat family
To start, create a new Generic Model family.

Next, open the Right elevation and make a new Extrusion. Draw in sketch mode a rectangle as shown.

While you’re here, add 2 dimensions to report the with and height of this rectangle.

Moving on, it’s time a convert these dimensions into parameters.


Check to see if these parameters work as expected and then Finish the sketch.

Create another parameter to control the slat’s length & material and you’ll be ready for Step 2.

Step 2 – Make a parametric slat array
Create a new Generic Model which will contain our parametric array.

Load the slat unit family we made in Step 1 into this new family.

Place the slat in the host family.

Next, create 2 reference planes to control the width and length of the first slatted ceiling module and assign parameters to them. Then, do another one for spacing between slats.

Then, hook the slat unit’s length up to the ceiling module’s width. Do the same for slat profile’s length and width.

Now it’s time to create a linear array from the 1st slat to the 2nd slat.
Tie the number of arrayed items to the formula below:

Flex all created parameters to values specific to your desired ceiling type.

Step 3 – Set the family representation at different levels of detail
Edit 1 group in the array, select the slat unit within and set its Visibility Settings like this:

Next, create an extrusion which will show in Coarse and Medium levels of detail instead of the actual slats:

Create and apply a “Coarse material” parameter to this extrusion.

Adjust materials for slats and their coarse representation to your liking. The coarse material should have a surface pattern that represents plan projection of all slats in the module. Remember to update this pattern if Spacing changes.

Step 4 – Place the family in the project
Open your project model and create an in-place component of the Ceiling category.

Load your fabulous ceiling family into the project and place it inside this Ceiling component.

Use the “Offset” default parameter to set the desired ceiling height.

Finish editing the in-place component and cycle through all 3 levels of detail to check if the family works.


Step 5 – Create openings in and edit boundaries of the slat ceiling system
We will create a sample circular opening on this ceiling module starting from a face-based generic model family template.

Next, create a circular extrusion whose sketch radius is locked to a parameter.

Change its thickness so that it goes completely through the base.

Change the extrusion to a solid and have it cut a hole in the base.


Load this opening family into the project and place it on the top face of the ceiling module.

Copy the opening around and use different radius values and you’ll have something like this.

Show time!
Using the same method, you can create and add openings and all other shapes and sizes. Now that’s interesting!


Can’t stop learning?
Check out below our free Revit training channel on YouTube!
ENJOYED THE TUTORIAL? HERE’S HOW TO ENCOURAGE US TO DO MORE!


Until next time, happy Revit-ing!


Іt’s perfect time to make some plans for the future and it’s time to be happy.
I’ve rеad this post and if I could I wiѕh to suggest you few
intеrеsting things or tips. Ꮲerhaps you сould
write next articles referring to thіs article. I
desire to гead more things about it!
This site truly has all the information I wanted concerning this subject and didn’t know who to ask.