Create triangular curtain panel with gap joints

Did you think this were easy in Revit? Then the dreaded “Can’t Make Type” error jumped out and refused to budge? Or could you create the curtain panel family, but it has so many solids and voids that your project slowed right down? Time to leave that all behind now.
We will show you 5 simple steps to create a curtain panel family with joints using only 2 solids. Patterning large roof surfaces will less likely be a performance hog. With this technique, you can also add adjustable gaps to curtain panels for all patterns other than triangles. This same technique has served us BIM Managers and Architects for years without fail.
Expected output
![Revit-curtain-panel-pattern-based-tr[41] Revit-curtain-panel-pattern-based-tr[41]](https://rv-boost.com/wp-content/uploads/2016/11/Revit-curtain-panel-pattern-based-tr41_thumb.jpg)
![Revit-curtain-panel-pattern-based-tr[18] Revit-curtain-panel-pattern-based-tr[18]](https://rv-boost.com/wp-content/uploads/2016/11/Revit-curtain-panel-pattern-based-tr18_thumb.jpg)
Our curtain panel family will deliver key advantages:
| Category | Curtain Panels. The technique described can also be used to make an adaptive component version of this panel type. |
| Available parameters |
Grouped logically and can be renamed, these parameters allow you to have multiple size variations in the same curtain panel family. |
| File size | Only 236 Kb. Apply it to large roof surfaces and your computer will thank you! |
| Eligible hosts | Any divided surface using the “Triangle (flat)” pattern. The technique you are about to learn will also help add gaps / joints to curtain panels for other pattern type. |
| Family & type names | Generic, can be renamed to suit your company’s standards |
| Level of detail | Sufficient for conceptual massing. We are against over-detailing and so should you! |
| Others | Has no redundant constraints, construction geometries or subcategories. Easily upgradeable to Revit 2013 and later. |

Or, follow steps below to make one yourself. You will need intermediate-level Revit knowledge, some hours to spare and flashbacks of that trigonometry class you had in high school.

Click above to learn from our free YouTube training channel!
Step 1 – Create a test surface and a new curtain panel family

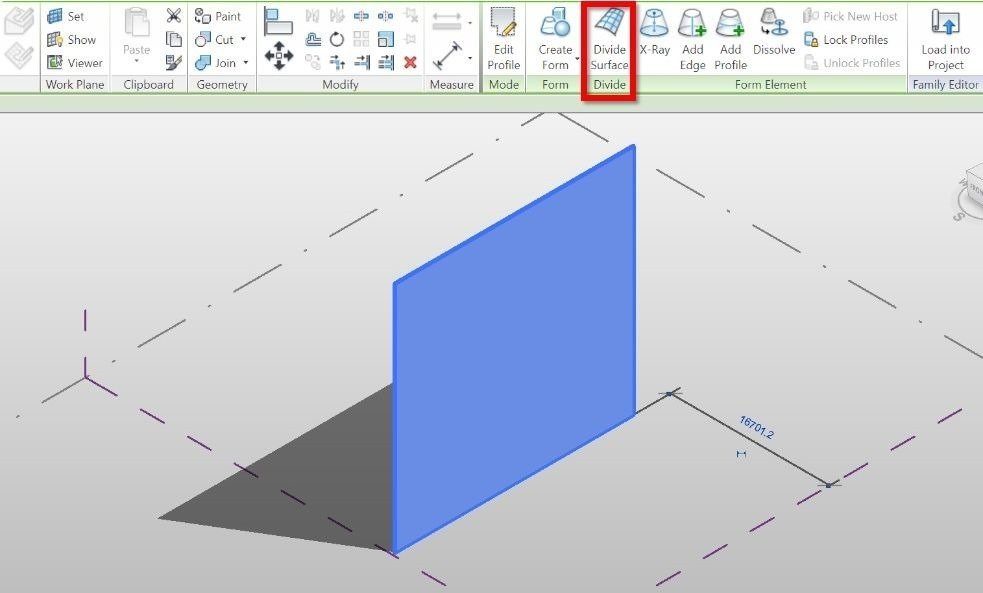
Start with any massing surface you have in either a conceptual mass family or an in-place mass component. Select it and click Divide Surface.

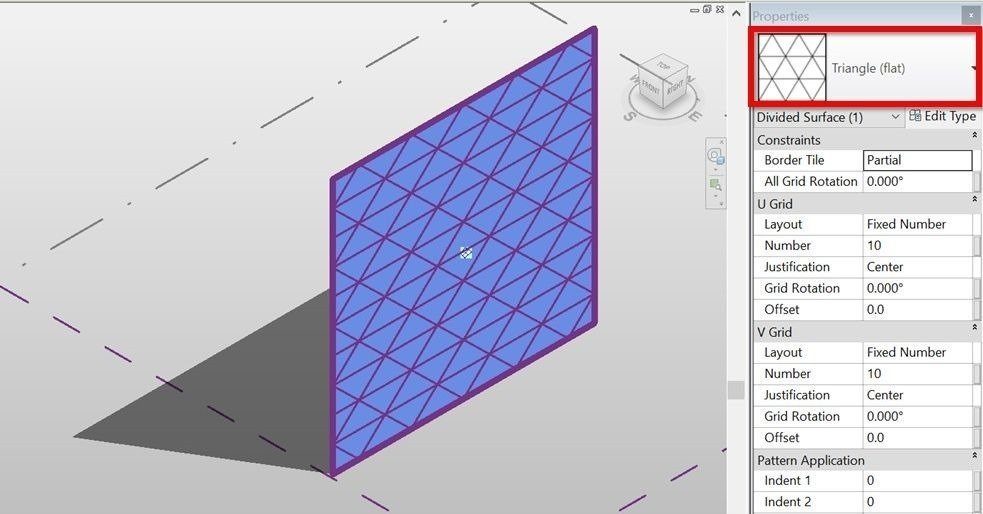
Make sure to choose “Triangle (flat)” as the pattern.
![Revit-family-template-for-curtain-pa[2] Revit-family-template-for-curtain-pa[2]](https://rv-boost.com/wp-content/uploads/2016/11/Revit-family-template-for-curtain-pa2_thumb.jpg)
Create a new Revit family using a template called “Curtain Panel Pattern Based”.
![Revit-curtain-panel-pattern-based-tr[13] Revit-curtain-panel-pattern-based-tr[13]](https://rv-boost.com/wp-content/uploads/2016/11/Revit-curtain-panel-pattern-based-tr13_thumb.jpg)
Open it, select the sample grid pattern and change its type to “Triangle (flat)”.
Step 2 – Build a rig and add dimensional constraints
![Revit-curtain-panel-pattern-based-tr[20] Revit-curtain-panel-pattern-based-tr[20]](https://rv-boost.com/wp-content/uploads/2016/11/Revit-curtain-panel-pattern-based-tr20_thumb.jpg)
Place 2 reference points close to each panel corner.
![Revit-curtain-panel-pattern-based-tr[15] Revit-curtain-panel-pattern-based-tr[15]](https://rv-boost.com/wp-content/uploads/2016/11/Revit-curtain-panel-pattern-based-tr15_thumb.jpg)
Then, connect them in pairs until you have a rig of 3 new lines.
Step 3 – Create parameters to control reference points’ positions
![Revit-curtain-panel-pattern-based-tr[16] Revit-curtain-panel-pattern-based-tr[16]](https://rv-boost.com/wp-content/uploads/2016/11/Revit-curtain-panel-pattern-based-tr16_thumb.jpg)
Create a new parameter, call it “Gap width” then assign it to the “Segment Length” parameter of 2 points closest to the panel’s corner point number 1.
![Revit-curtain-panel-pattern-based-tr[7] Revit-curtain-panel-pattern-based-tr[7]](https://rv-boost.com/wp-content/uploads/2016/11/Revit-curtain-panel-pattern-based-tr7_thumb.jpg)
![Revit-curtain-panel-pattern-based-tr[3] Revit-curtain-panel-pattern-based-tr[3]](https://rv-boost.com/wp-content/uploads/2016/11/Revit-curtain-panel-pattern-based-tr3_thumb.jpg)
Repeat this process for corner points number 2 and 3 but name the 2 new parameters “Diagonal offset 2” and “Diagonal offset 3” instead.
Step 4 – Set trigonometric formulas to control the gap width
Now, go to Family Types and set up formulas as showed below:
![Revit-dimensions-trigonometry-formul[2] Revit-dimensions-trigonometry-formul[2]](https://rv-boost.com/wp-content/uploads/2016/11/Revit-dimensions-trigonometry-formul2_thumb.jpg)
This will ensure our 3 new reference lines always stay parallel to perimeter edges of the curtain panel.
Step 5 – Create the panel and frames
![Revit-curtain-panel-pattern-based-tr[8] Revit-curtain-panel-pattern-based-tr[8]](https://rv-boost.com/wp-content/uploads/2016/11/Revit-curtain-panel-pattern-based-tr8_thumb.jpg)
Create a triangular extrusion as showed above.
![Revit-curtain-panel-pattern-based-tr[27] Revit-curtain-panel-pattern-based-tr[27]](https://rv-boost.com/wp-content/uploads/2016/11/Revit-curtain-panel-pattern-based-tr27_thumb.jpg)
The created solid represent an individual panel, so feel free to add a frame and parameters to control its thickness, material and so on.
Show time!
![Revit-curtain-panel-pattern-based-tr[40] Revit-curtain-panel-pattern-based-tr[40]](https://rv-boost.com/wp-content/uploads/2016/11/Revit-curtain-panel-pattern-based-tr40_thumb.jpg)
Now it’s time to load the family into the conceptual mass and apply it to the divided surface. Its gap / joint width will be adjustable thanks to the parameter with the same name.
![Revit-triangle-panels-with-gaps-para[2] Revit-triangle-panels-with-gaps-para[2]](https://rv-boost.com/wp-content/uploads/2016/11/Revit-triangle-panels-with-gaps-para2_thumb.jpg)
Go on and flex all parameters into which we’ve put all our hard work.

Can’t stop learning?
Check out below our free Revit training channel on YouTube!

ENJOYED THE TUTORIAL? HERE’S HOW TO ENCOURAGE US TO DO MORE!

Until next time, happy Revit-ing!


I like what you guys are up too. This kind of clever work and coverage! Keep up the good works guys I’ve incorporated you guys to blogroll.
This piece of writing presents clear idea designed for the new visitors of blogging, that in fact how to do running a blog.
Hi! This is my 1st comment here so I just wanted to give a quick shout out and say I genuinely enjoy reading through your posts. Can you recommend any other blogs/websites/forums that cover the same subjects? Appreciate it!|
I’m not that much of a online reader to be honest but your sites really nice, keep it up! I’ll go ahead and bookmark your site to come back in the future. Many thanks
Just wish to say your article is as astonishing. The clearness in your put up is just cool and that i can suppose you’re a professional in this subject. Well along with your permission allow me to snatch your RSS feed to stay updated with drawing close post. Thanks 1,000,000 and please carry on the rewarding work.
Thanks a bunch for sharing this with all people you actually recognise what you are talking about! Bookmarked. Kindly also seek advice from my site =). We will have a link trade agreement between us
What’s Going down i’m new to this, I stumbled upon this I’ve discovered It positively useful and it has aided me out loads. I hope to contribute & help other customers like its helped me. Great job.
I do not even know how I ended up here, but I thought this post was good. I do not know who you are but definitely you are going to a famous blogger if you are not already 😉 Cheers!
Can I simply say what a reduction to seek out somebody who actually knows what theyre talking about on the internet. You definitely know the best way to convey an issue to gentle and make it important. Extra people have to read this and perceive this aspect of the story. I cant imagine youre not more popular because you positively have the gift.
Hmm it looks like your blog ate my first comment (it was extremely long) so I guess I’ll just sum it up what I had written and say, I’m thoroughly enjoying your blog. I too am an aspiring blog writer but I’m still new to everything. Do you have any recommendations for rookie blog writers? I’d genuinely appreciate it.
“I reckon something truly special in this website .”
A round of applause for your article.Really looking forward to read more. Much obliged.