SCHEDULE REVIT DOORS & WINDOWS BY FROM-ROOM & TO-ROOM IN LINKS
As projects become more complex, it’s common to have Revit rooms and door/windows in different models. Unfortunately, FromRoom and ToRoom parameters don’t get populated automatically in this scenario. Let’s see some easy steps to resolve this problem.
1- ADD NEW DOOR/WINDOW PARAMETERS FOR FROMROOM AND TOROOM
Although Revit’s default FroomRoom and ToRoom parameters are handy, you probably have noticed that they are not part of any door’s or window’s parameter set. This is because they only exist in schedules.
To have more control over this data, we need to have our own parameters. Since we will need these to appear in schedules later, they’ll need to be shared parameters.
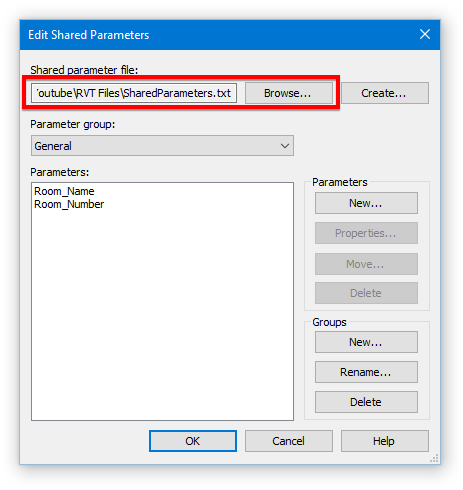
To begin, go to Manage > Shared Parameters and make sure you’re using the correct shared parameters file path.
If you want to switch to a different shared parameters file, click Browse to do that now before moving to the next step.
Next, you can optionally create a parameter group for Doors if there isn’t one already.
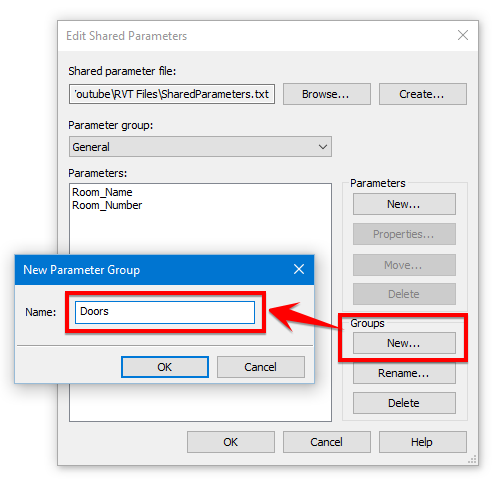
Select the “Doors” parameter group in the dropdown, we can now create a new shared parameter called FromRoom. Make sure to make its type “Text”:
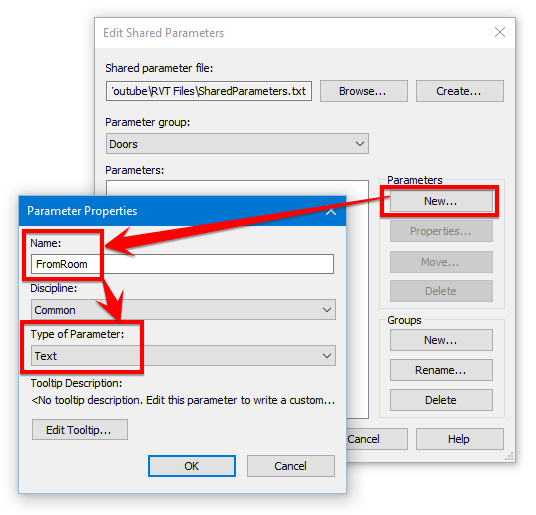
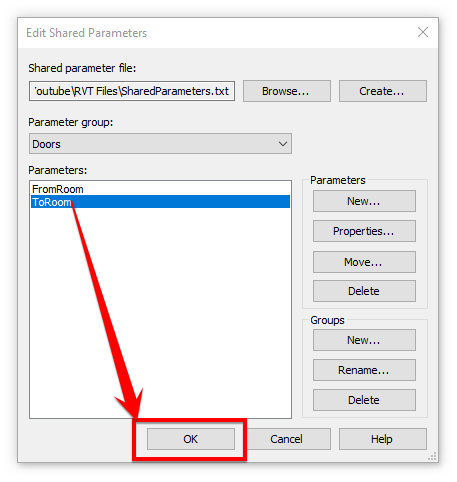
Repeating the same steps, create another shared parameter called ToRoom, then click OK.
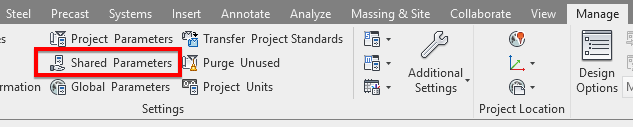
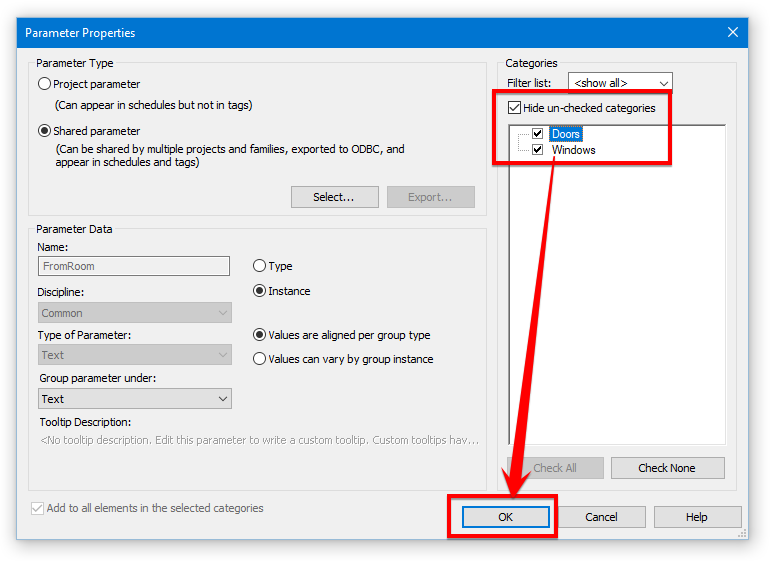
Next, go to your Revit model where you have doors and windows which need room information, and choose Manage > Project Parameters:

Choose to add the FromRoom parameter we created before as a new shared parameter in this project.
Under Categories, select only Doors and Windows, then click OK:
Repeat these steps to add the ToRoom parameter to your doors and windows as well:

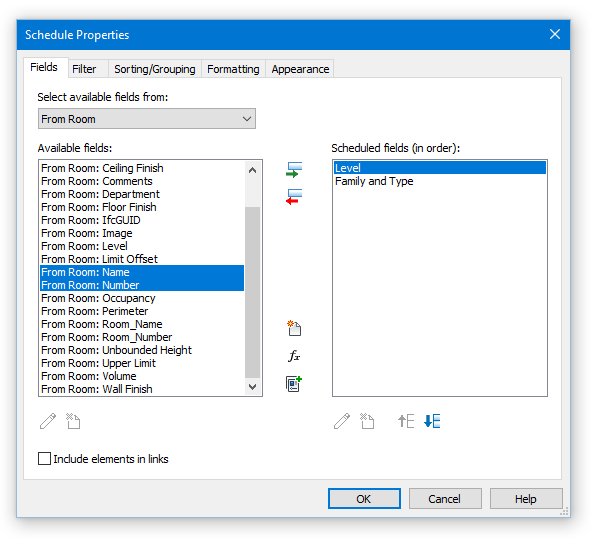
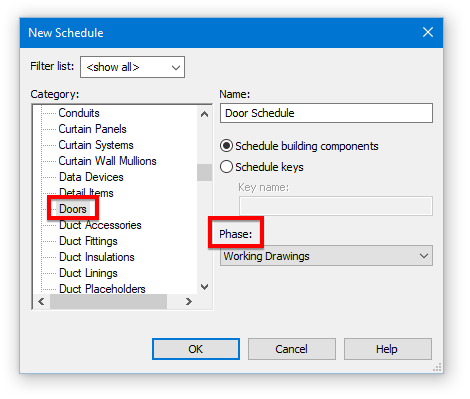
With these in place, it’s time to create a door or window schedule! Make sure to select the right phase to show your required elements:
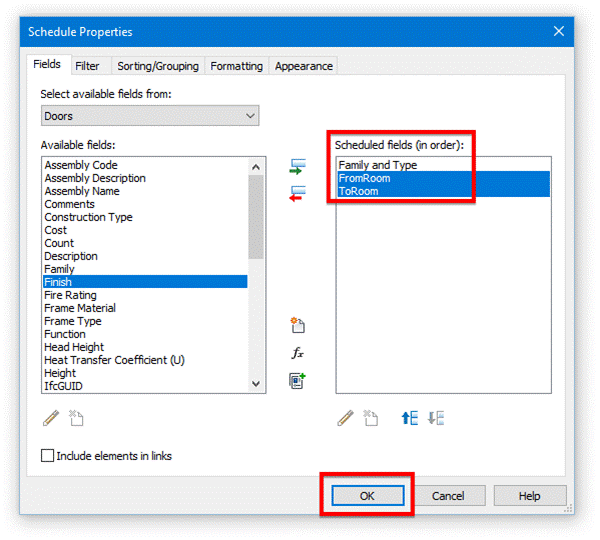
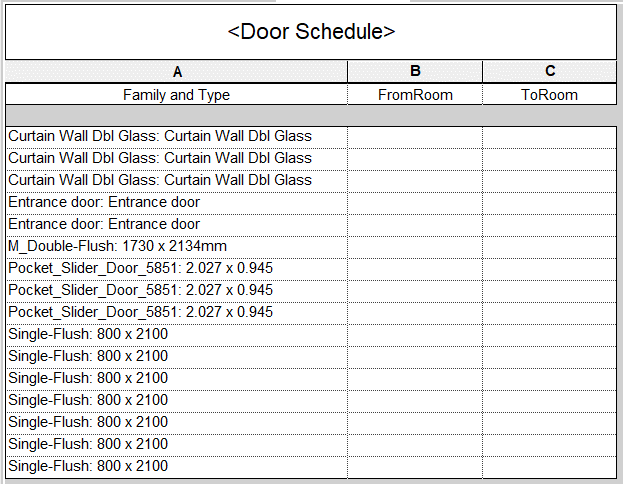
Select any fields you want to include in this new schedule, along with FromRoom and ToRoom of course:

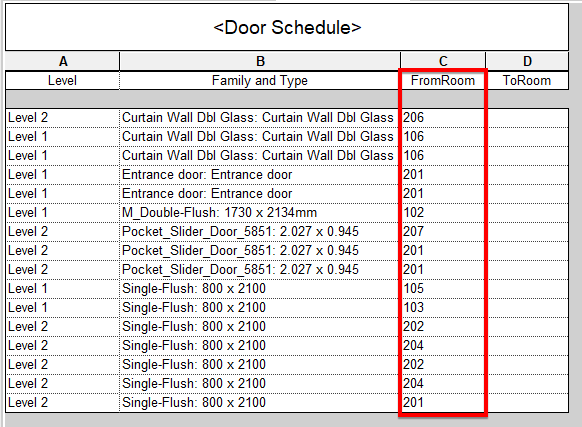
At a minimum, your schedule may look like this, ready for our next step:
RUN RV ROOMLINK
To turn these empty parameters into something useful, we’ll need a nice little Revit plugin called RV RoomLink. It’s totally free to try so if you haven’t already, simply click here to install it.
Once installed, it can be opened from your Revit’s Add-Ins tab:

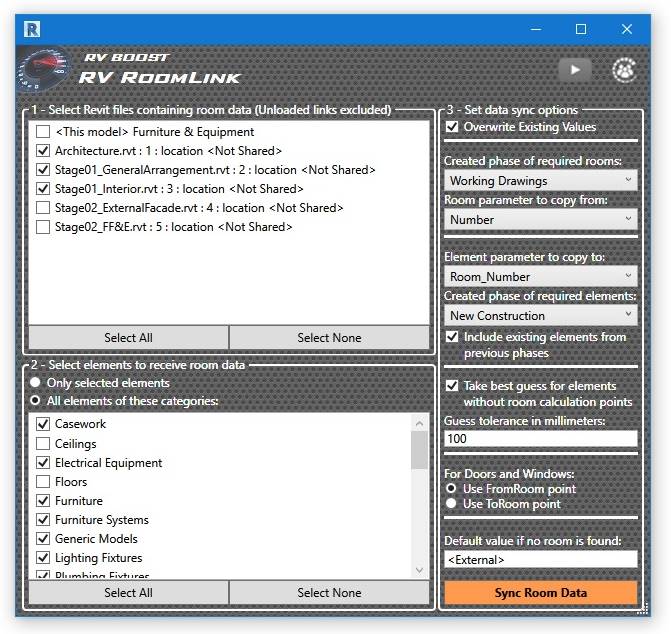
Launch RV RoomLink from there and you will see this intuitive interface:
SELECT REVIT FILES CONTAINING ROOM DATA
On the top left, RV RoomLink will show all Revit links currently loaded in your model. The current model is also listed here on top and marked as <This model>. This makes sure you can collect data of rooms from any Revit files. This offers great flexibility in structuring your models for performance, not to get around Revit limitations!
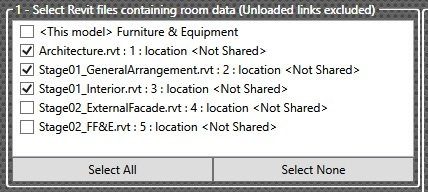
Simply tick boxes of links you want RV RoomLink to pull room information from, and move to the next step.
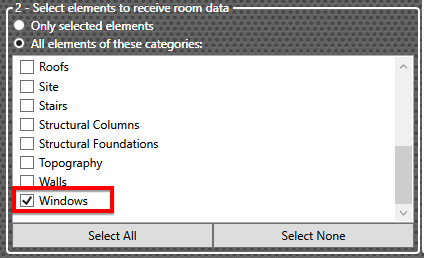
SELECT ELEMENTS TO RECEIVE ROOM DATA
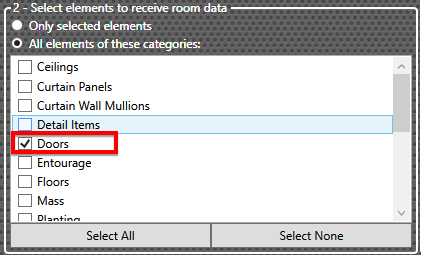
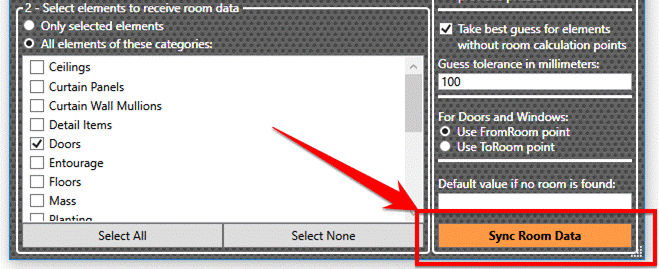
It’s straightforward here. Simply tick boxes for Doors and Windows. Note that RV RoomLink only lists here categories currently in use in your model, so if you don’t see a box here for Doors, that’s simply because you haven’t placed any in your building!
SPECIFY SYNCING OPTIONS
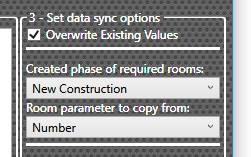
This is where RV RoomLink offers the most flexibility. Going top to bottom, you can choose:
- Overwrite existing values: If not, the addin will always copy room data to elements, regardless of whether some elements already contain room data from previous runs.
- Created phase of required rooms: select the design phase you want RV RoomLink to collect room data from. If you selected more than 1 Revit file in the previous step, all their phases will be available here in this menu.
- Room parameter to copy from: Exactly what it says, here you can select which room parameter the addin should look up for room data, for example “Name”, “Number” or any custom shared parameters already added to rooms in these Revit links.
The next 3 syncing options deal with elements in your current model, i.e. doors and windows in this example.
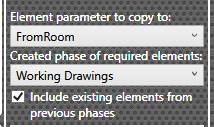
- Element parameter to copy to: Here you can select the FromRoom shared parameter we previously added to all doors and windows in this model. Don’t worry about ToRoom, we will repeat this same process to populate it soon.
- Created phase of required elements: Simply select here the phase which you created doors and windows on. Only elements created on it will get room data.
- Include existing elements from previous phases: Enable this to use it in combination with the previous setting. For example, let’s say you have 2 phases in your project, New and Existing. To include all elements showed as completed in the New phase, you can select New in the previous step, then tick this box here to also include elements created in Existing and not yet demolished in New.
There are a few more options below these 3 but we’ll look at them later. For now, click on Sync Room Data:
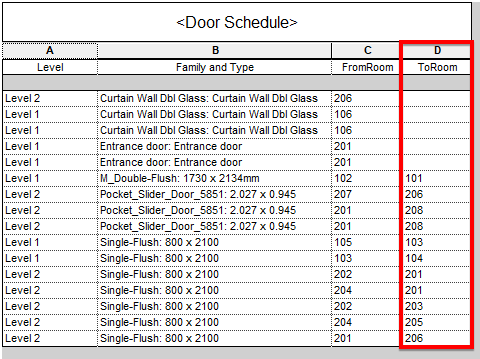
After a split second, you will see the FromRoom parameter fully populated!
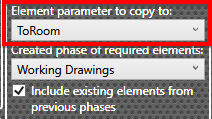
To do the same for ToRoom, run RV RoomLink again from the Add-Ins tab. You will see that it remembers all your previous settings. Simply change “Element parameter to copy to” to ToRoom:
Look a bit further down and change “For Doors and Windows” to “Use ToRoom point”:
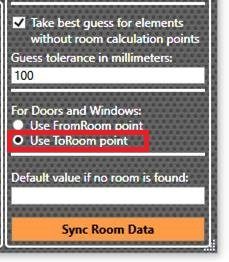
You can also see here some extra options RV RoomLink offers to ensure best room detection result:
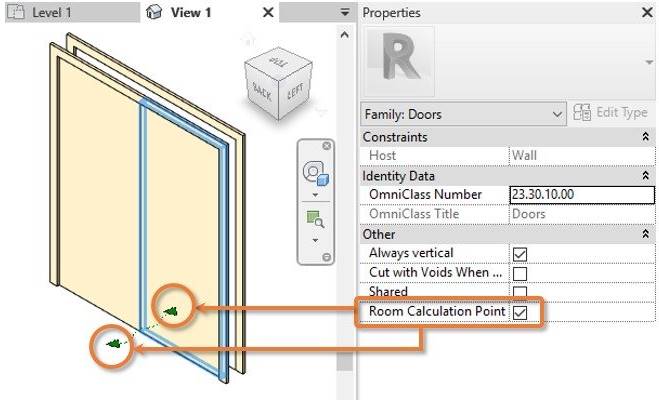
- Take best guess for elements without room calculation points: Remember these points you can enable in the Family Editor? Simple enough to do, but image having to do it for 200 door families in your project! Luckily, this option is here to tell RV RoomLink that for any door without these room calculation points enabled, compute these points on-the-fly during room checking to ensure the best result.
- Guess tolerance in millimetres: This specifies how far away from a door’s location point should RV RoomLink place temporary room calculation points if enabled in the previous setting. A higher value here will give the most number of rooms, but of course don’t be too generous because then you’ll get false positives. The rule is to start low with something in the range of 20-50mm, and then increase it a little at a time until you get the most number of accurate rooms detected.
- Default value if no room is found: We usually type in here <External> or <N/A> if we’re confident any door or window left without a room shouldn’t have one anyway.
Finally, click Sync Room Data again and you will like the result:
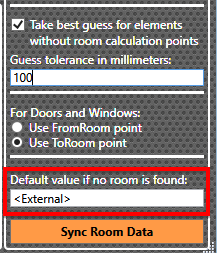
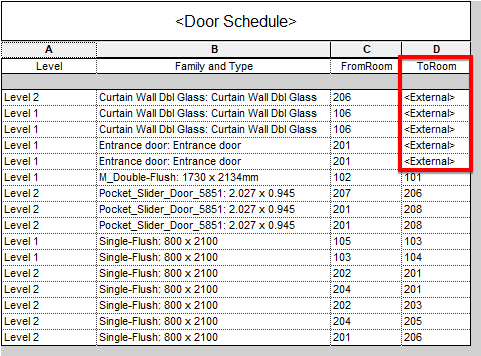
As you can see, the first few doors still don’t have a ToRoom. It turns out they are external doors:

Therefore, let’s run RV RoomLink once again to complete the task. This time, keep all settings the same but set “Default value if no room is found” to “<External>”.
Click Sync Room Data one more time and it should put a smile on your face:
YOU CAN DO IT TOO!
To easily schedule doors and windows by linked rooms, get a completely free trial of RV RoomLink here. We await your success story!