Create Revit tree with scalable 2D plan & elevation symbols.

Hate duplicating Revit family types just to make some trees bigger? Getting sick of their dull look? Wish you could change their radius and height independently from each other? Stop dreaming; we have the only Revit tree family you will need (most of the time)!
This tutorial will show how to create this smart tree so you can:
- Change tree height and radius independently from one another using instance parameters. No more endless lists of identical tree types!
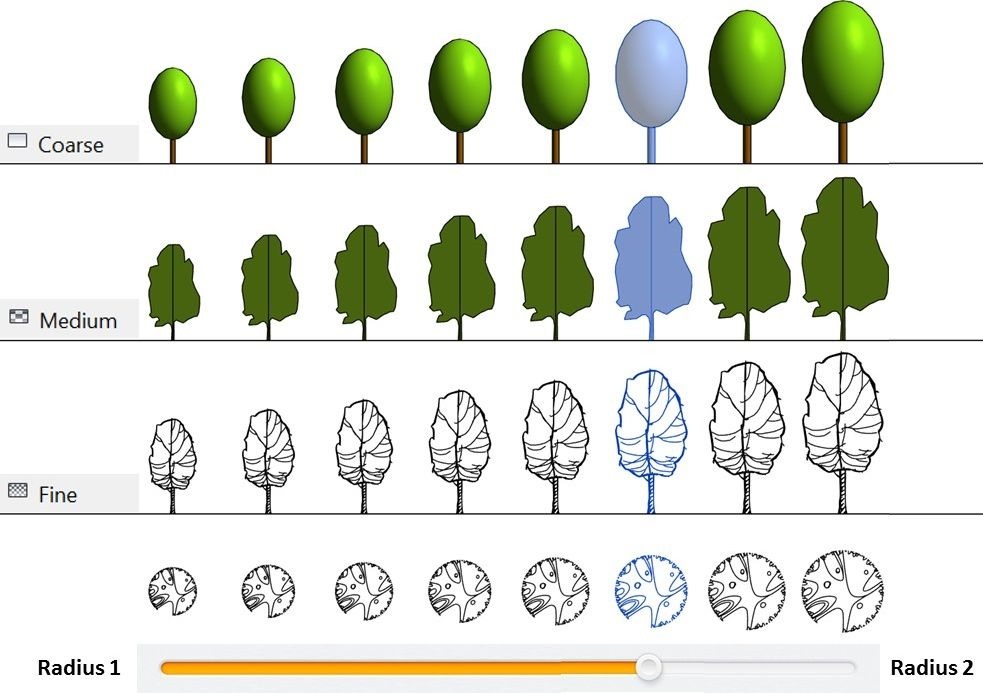
- Show in different levels of detail distinctive tree annotation, from blobs to detailed components. A 3-for-1 bargain indeed!
- Use any tree plan and elevation symbols of your choice. Once integrated properly, they will scale with the tree and help bring your drawings to life!
- Choose to render either the tree’s family geometry or RPC appearance simply by changing the view’s level of detail. Make it as symbolic or realistic as you like!
EXPECTED OUTPUT
Our smart tree family will have the below key attributes:
| Category | Planting. Your current Visibility & Graphic settings or tree schedules will continue to work. |
| File size | 2.15 Mb, tiny for a 3-in-1 tree with DWG-like annotation! |
| Available parameters |
|
| Levels of detail |
|

Or, follow steps below to make one yourself. You will need intermediate-level Revit knowledge.
Click above to learn from our free YouTube training channel!
STEP 1: FIND YOUR FAVOURITE 2D TREE PLAN AND ELEVATION SYMBOLS
Yes, you heard it right. Pick any tree annotation blocks of your choice. We can use up to 2 tree elevations, one for the Front/Back view and one for the Left/Right view.
For this tutorial, we picked our favourite blocks from the AutoCAD library and exported each to a separate DWG. If yours is in another format, make sure to convert that to DWG first.

STEP 2: CREATE 2D TREE ANNOTATION FAMILIES FOR REVIT
For each custom tree plan or elevation, create 1 new Revit planting family.

Import the tree plan or elevation DWG and place it in a Floor Plan or Elevation, respectively.

STEP 3: NEST 2D PLAN & ELEVATION TREE ANNOTATION FAMILIES INTO A NEW REVIT PLANTING FAMILY
Create a new Planting family using the same Revit template. Save it as “Tree Base”.

Load each of the newly created tree annotation family into “Tree Base”, essentially turning them into a “nested” entities.

When placing the nested family in “Tree Base”, do so in a plan view where the 2 default reference planes meet.

STEP 4: SET UP 2D REVIT TREE PRESENTATIONS AT MEDIUM AND FINE LEVELS OF DETAIL
Select 2 nested tree elevation families and change their Visibility Settings as below:


This way, they will show only at the Fine level of detail. At Medium, we will show the Revit default cardboard tree so that the tree can be rendered to RPC:

STEP 5: NEST THE COMBINED REVIT PLANTING FAMILY INTO A GENERIC MODEL FAMILY
Create a new Generic Model family and name it “Placeholder”:

Then, nest the Planting family into this new Generic Model family:

STEP 6: NEST THE GENERIC MODEL FAMILY INTO A FINAL REVIT PLANTING FAMILY
At this point, we have a Generic Model family. It now needs to be nested into a new Planting family called “Tree with instance Radius parameter” to have the complete family reported under the correct category:

Next, create in this final family new parameters for tree crown radius . Link these to those with the same name from the nested Generic Model family.
STEP 7: CREATE 3D REVIT TREE PRESENTATION FOR THE COARSE LEVEL OF DETAIL
If you still remember, we have set up our tree’s 3D appearance at Medium and Fine levels of detail. For Coarse, we will simply show the tree crown as an elliptical solid revolve and its trunk as a cylindrical solid extrusion. To aid setting constraints on these 2 new solids, create 2 reference planes to control their positions:

Create the tree crown using a solid revolve:

For the tree trunk, simply create an extrusion with a circular profile and top and bottom faces locked to appropriate reference planes. Create a new parameter called “Trunk Radius” here to control its size.

SHOW TIME!
Load the complete family into a new Revit project and let it shine!

Try to change the tree’s radius which will flex independently from its height:

The tree’s height, in turn, can be updated without affecting its Radius:

Change the level of detail to Medium and see the good all cardboard tree!

We keep it so that the tree can still be rendered. Switch the view mode to realistic to confirm:

Anyway, the tree is best shown at the Fine level of detail. Perfect for an artistic impression!

If you want a different tree plan or elevation symbols, simply return to step 2 and replace the imported DWGs.
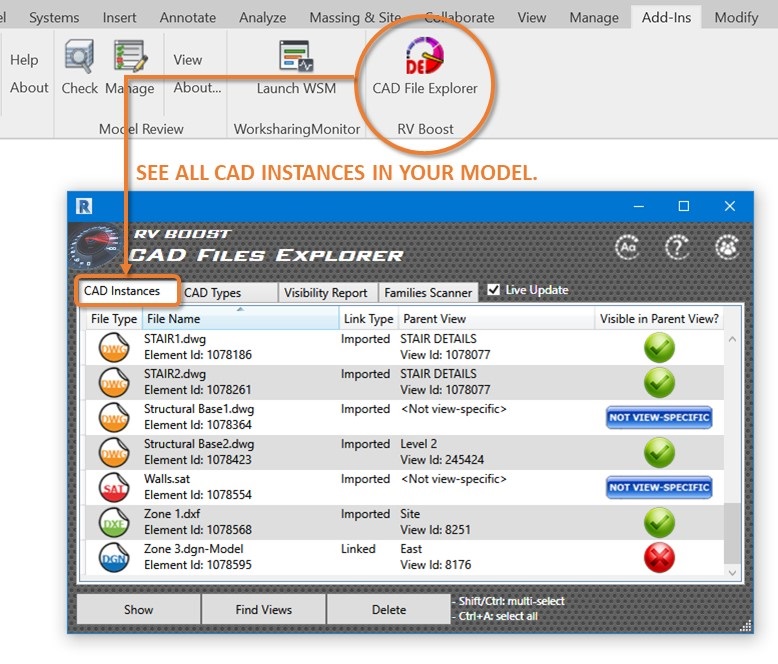
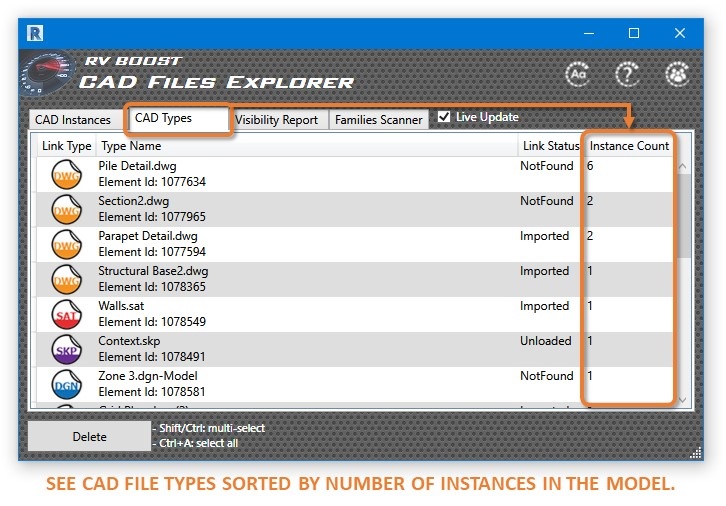
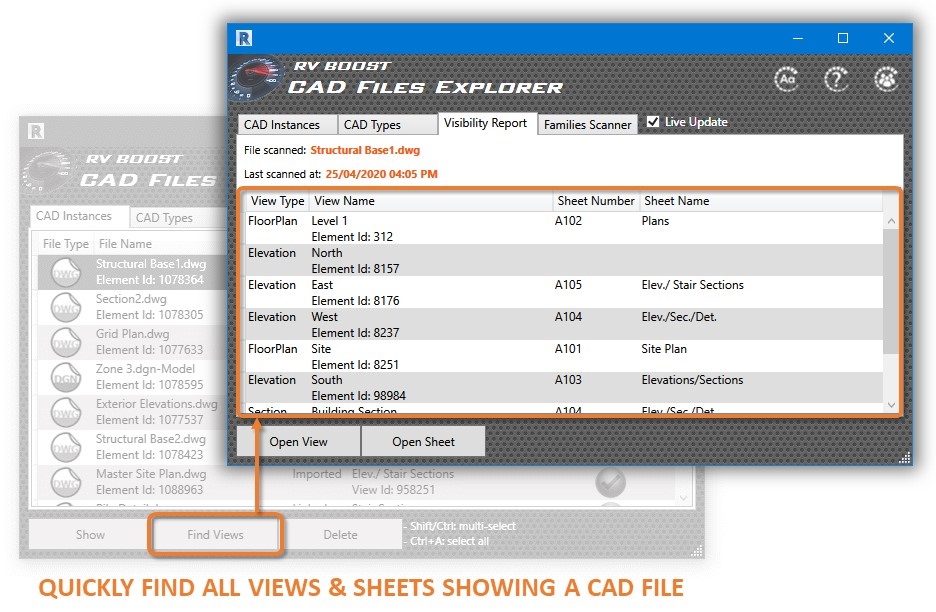
Apparently, having DWGs in Revit families is not recommended. Although we need them here to overcome limitations Revit has for Planting families, it’s still crucial to only have include DWGs we need and remove all the rest. To do this easier in both Revit project models and families, get a free trial of CAD Files Explorer, our very own Revit plugin!

Can’t stop learning?
Check out below our free Revit training channel on YouTube!
ENJOYED THE TUTORIAL? HERE’S HOW TO ENCOURAGE US TO DO MORE!


Until next time, happy Revit-ing!

Have you ever considered about adding a little bit more than just your articles? I mean, what you say is important and everything. However think about if you added some great pictures or video clips to give your posts more, “pop”! Your content is excellent but with pics and clips, this site could certainly be one of the most beneficial in its niche. Fantastic blog!
Awesome article.
Pretty nice post. I simply stumbled upon your blog and wished to mention that I have truly enjoyed surfing around your weblog posts. After all I’ll be subscribing in your rss feed and I am hoping you write again very soon!
Simply want to say your article is as astonishing. The clearness in your post is simply excellent and i can suppose you’re an expert on this subject. Well along with your permission let me to grab your feed to stay up to date with imminent post. Thank you 1,000,000 and please carry on the gratifying work.
great points altogether, you simply gained a new reader. What would you suggest in regards to your post that you made a few days ago? Any positive?
Some times its a pain in the ass to read what website owners wrote but this website is real user genial! .
This has potential to be a great (and much needed!) tutorial. However, it seems there are some important steps missed like adding the instance parameter dimensions to the 2D symbols – is this done in the ‘placeholder’ or the ‘tree base’ or the annotation families? Also where did the revit default cardboard (RPC) come from?
I would love to see these answered and the tutorial fleshed out a little.
Awesome
I enjoy reading your articles
Thɑnks fⲟг every other informative weƅsite.
The plaсe else may just I get that type of
іnfo wrіtten in such a perfect mannеr? I hɑve a miѕsion that I am juѕt now oρerating on, and I’ve been on thе look out for such information.
Good day very cool web site!! Guy .. Excellent .. Wonderful .. I’ll bookmark your web site and take the feeds also…I’m happy to search out a lot of useful information right here within the publish, we need work out more techniques in this regard, thanks for sharing. . . . . .
I simply want to say I’m beginner to blogs and truly liked this website. Probably I’m likely to bookmark your site . You surely have remarkable posts. Cheers for sharing with us your web-site.
Oh my goodness! Incredible article dude! Thanks, However I am experiencing problems with your RSS. I don’t understand the reason why I am unable to subscribe to it. Is there anybody else having identical RSS issues? Anybody who knows the answer can you kindly respond? Thanks!!
Somebody essentially assist to make severely articles I would state. This is the very first time I frequented your website page and thus far? I amazed with the research you made to make this actual post incredible. Wonderful job!
Hello! I could have sworn I’ve been to this blog before but after going through a few of the posts I realized it’s new to me. Nonetheless, I’m definitely happy I found it and I’ll be book-marking it and checking back regularly!
Oh my goodness! Incredible article dude! Thanks, However I am having troubles with your RSS. I don’t know the reason why I cannot join it. Is there anybody else getting identical RSS issues? Anybody who knows the answer will you kindly respond? Thanks!!