
How to Schedule Revit Doors & Windows by Linked Rooms
Have you ever tried to schedule Revit doors and windows by linked rooms and get the below rather disappointing result? In this tutorial, we will see how to quickly get room information into these empty schedule cells using an automated workflow.
WHY REVIT SCHEDULES DON’T WORK WITH LINKED ROOMS
It may seems perfectly logical to expect Revit to pull room data from your linked files and associate that with doors and windows in your live model. However, the added layer of linking actually introduces considerably more complexities, to name a few:
- There can be more than one Revit links in your model. How can Revit know which if any of those it should check for room information?
- Each Revit link can have multiple phases, each with its own set of rooms. How can Revit know which phase to pull room data from?
- Phases in Revit links may be mapped to those in the main model in particular ways, where it’s not simply that phases of the same names are mapped to one another. How can Revit be sure where to look for linked rooms?
- Each Revit link can have a different set of room parameters, many of which are shared. How can Revit assume we want values of the same room parameter from all links, or whether we need to read a different parameter in each one?
Essentially, it’s not that Revit can’t pull room data from links. We know they are there because all is visible once we select a room in a linked file. It’s the number of additional inputs that Revit needs to pull correct linked room’s information which prevents scheduling objects by linked rooms a difficult task. Some of these inputs are:
- Which Revit links to get rooms from
- Which phase in these links should room be checked
- Which room parameter should Revit find in these links
Fortunately, we can use a handy Revit add-in called RV RoomLink to supply the missing inputs, establish this missing link between the main model and linked rooms, and make scheduling doors and windows by linked room possible and fast.
PREPARING PARAMETERS FOR RECEIVING LINKED ROOM DATA
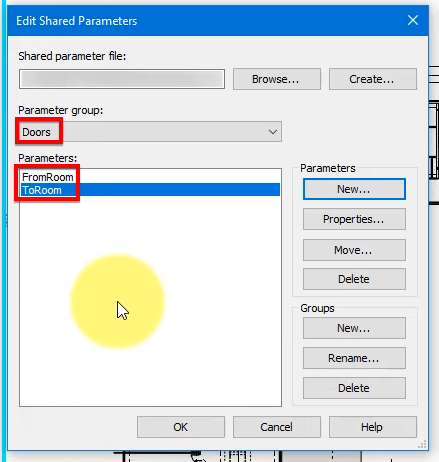
As you saw above, usual parameters typically used to refer room information of elements aren’t useful in our case here. Instead, let’s create new shared parameters which we will shortly fill in with required linked room data. To begin, go to Manage > Shared Parameters.

It’s highly recommended that you create logical groups for these new parameters if not done already. Also, because doors and windows ideally should have a different room on each sides, create for each required attribute a FromRoom and a ToRoom parameter. For example, if you need room number, create 2 shared parameters called “FromRoom Number” and “ToRoom Number”. For demonstration purposes, we created ours simply as “FromRoom” and “ToRoom” under a group called “Doors”. You can of course, and should, do the same for windows.
When you create each shared parameter, make sure to set the data type to Text. This is because Revit room numbers use text values. Even if you later changed your mind and want to pull in from your Revit links a different room parameter, such as Area, a text target parameter will also work best. This is simply because almost anything you see in Revit can be convert to a text-based representation.

Now that you’ve created the required parameters for doors and windows, go to Manage > Project Parameters.

Here, add the created shared parameters to your project. Make sure to set them as Instance parameters. This is so each door and window in your model can have a different room number without you having to duplicate their type every time this value changes. That would be a very tedious task!
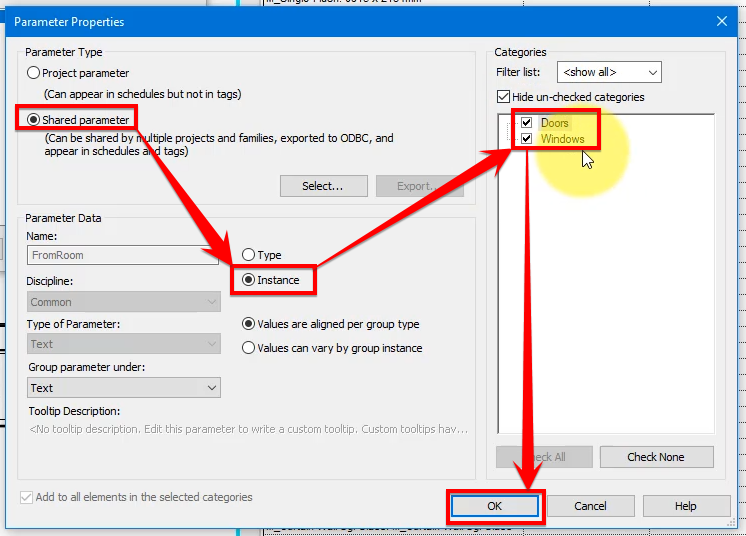
Also, choose Doors and Windows as categories for these new parameters to bind to. Repeat these steps until all required shared parameter are added. We’re now ready for the next step!
RUN RV ROOMLINK
As we mentioned earlier, Revit can see room data from links. It just needs additional inputs from us to know which rooms it should retrieve and how information should be transferred to the main model. This is where we need our handy Revit plugin called RV RoomLink.
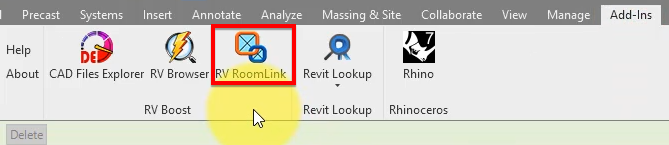
It’s completely free to try so if you haven’t already, click here to download and install RV RoomLink. Once that’s done, you can launch the plugin from your Revit’s Add-Ins tab.
The plugin is quite self-explanatory. Overall, it helps you let Revit know:
- Which Revit links should have rooms checked,
- Which doors and windows in the main model should receive linked room data, &
- How to get the best room detection result for your windows and doors

SPECIFY REVIT LINKS CONTAINING ROOM DATA
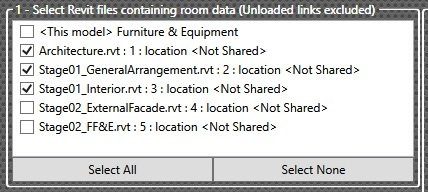
Here you will see the current model listed first as “<This model>”, then all Revit links loaded into it. Note that any links unloaded will now show here, so if a particular link you need isn’t listed, make sure to reload that file first and then come back here.
Next, simply select all links which contain rooms you want to associate to your doors and windows.
SELECT DOORS AND WINDOWS TO RECEIVE ROOM DATA
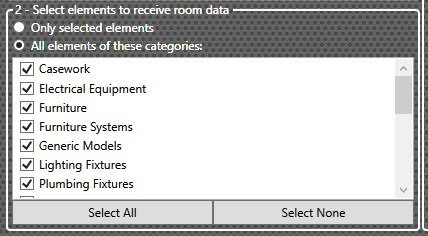
Just below the link selection area, you will see a list of element categories being used in your current Revit model. This list is dynamo so can show different across your Revit files. Assuming you have opened the model with doors and windows, simply select these 2 categories here.
Alternatively, you can also select a few windows and doors before launching RV RoomLink, and at this step pick “Only selected elements”. This way, you can fully control which elements should have their room data updated and leave the rest of your Revit model untouched.
SET SYNC OPTIONS
We’re almost there! This next step is to tell RV RoomLink a few more granular preferences you want it to apply while pairing up rooms to your doors and windows. The key ones are:
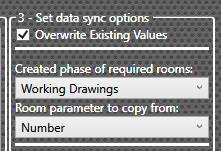
- Overwrite Existing Values: If no, RV RoomLink will update empty door or window parameters.
- Room phase: Set the phase in the Revit link from which RV RoomLink should collect room data.
- Room Parameter: The parameter of said rooms you want to copy information from.
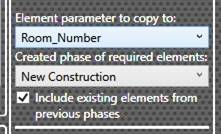
- Element Parameter: Choose one of the shared parameters we created previously for door and window to copy room data to.
- Element Phase: Set the phase for desired windows and doors.
- Include Existing Elements from Previous Phases: If you have more than 1 phase, tick this box to also update existing doors and windows. For example if you select “New Construction” for Element Phase, this will also add doors and windows create in a previous phase like “Existing” and not yet demolished in “New Construction”.
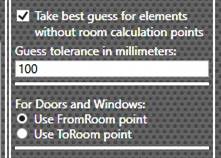
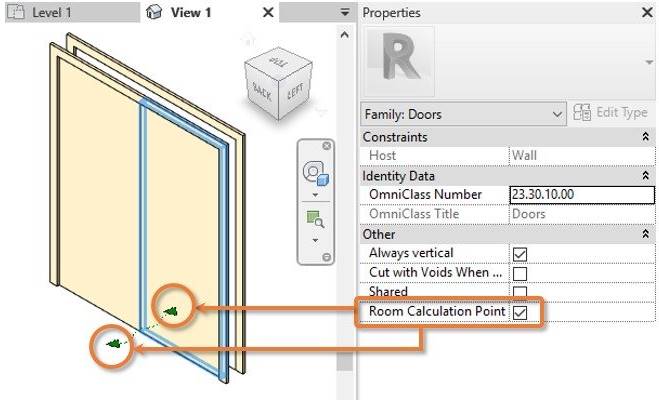
- Take Best Guess For Elements Without Room Calculation Points: Remember these FromRoom & ToRoom points? If you forgot to enable them for some door and window families, tick this box to let RV RoomLink do that on the fly for you!
- Guess Tolerance: Specify how far away from the door’s or window’s location point should RV RoomLink construct guessed FromRoom & ToRoom point.
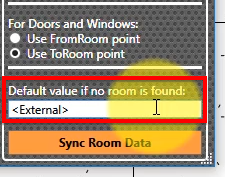
- Use FromRoom/ToRoom point: Set whether the app should find room on the FromRoom or ToRoom side of your doors and windows.
COPY LINKED ROOMS’ DATA TO WINDOWS AND DOORS
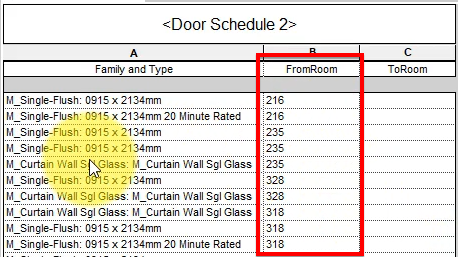
Here comes the moment all has built up to! With all options set and ready to go, simply smash that “Sync Room Data” button and let RV RoomLink do its magic. The result should look like this:
Let’s do the same now to fill in the ToRoom parameter. Launch RV RoomLink again and you will see it has saved all your previous settings. Simply change the below from “Use FromRoom point” to “Use ToRoom point”.
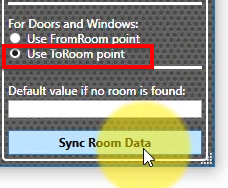
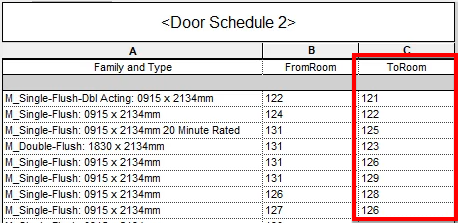
Hit Sync Room Data again and see RV RoomLink quickly completes the task:
PRO-TIPS
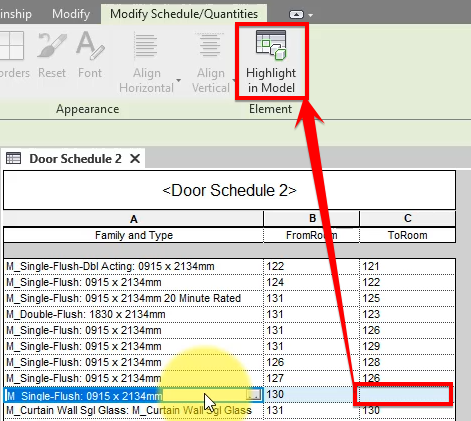
Of course, RV RoomLink does its best to detect as many rooms as possible for your doors and windows, but it can’t invent data for elements not sitting in any room. At times, you will see empty cells in your schedule even after following this workflow. When that happens, check these doors or windows in 3D to verify if they are actually in at least 1 room. To quickly jump to where an element in the schedule is, select its row, then click this button on your Revit ribbon:
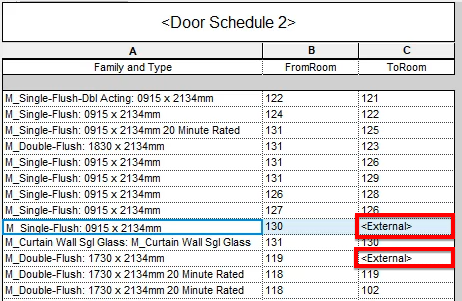
Sometimes, such an empty is expected for external doors and windows because they only have room on 1 side. If you’re confident these are all left with empty schedule cells, run RV RoomLink again with this option below set to some note like “<External>”. That will fill in these cells with the text, thus completing your door/window schedule.
SUMMARY
There you have it, our recommended way to quickly and precisely schedule doors and windows by linked rooms. Thanks to RV RoomLink, you are in full control to supply Revit additional inputs it needs, such as phases, parameters and point guessing method, to then sync your schedule with the required room information from your Revit links. Feel free to click below for a free trial of this addin, and put more efficiency into your Revit workflow.
