Revit Tag Fix: Move Leader Start Point Easily
If you have ever struggled with Revit tag leaders pointing to awkward or inconsistent locations, you are not alone. This is a common frustration that affects both beginners and experienced BIM professionals.
The good news is that there is a simple and powerful way to fix it. In this guide, you will learn how to control the tag leader start point in Revit and achieve clean, precise annotations every time.
Resources
Why Revit Tag Leaders Behave This Way
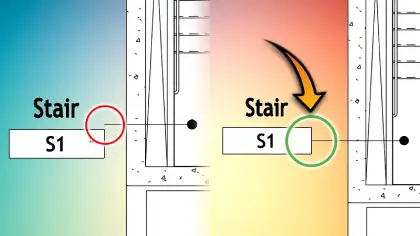
By default, Revit calculates the tag leader start point based on the bounding box of the tag.
This means:
• The leader attaches to the midpoint of the tag boundary
• Labels inside the tag affect where the leader starts
• You often get unexpected and messy results
This behavior is automatic, but not always helpful.
What You Will Learn
In this tutorial, you will discover two effective methods to take control of your tag leaders:
• How to fix incorrect leader start points
• How to clean up tag placement instantly
• How to gain full manual control over leader positioning
• How to enable snapping to precise locations
Method 1 Control the Tag Bounding Box
This is the recommended approach for most situations. Inside the tag family, you can exclude specific labels from the leader outline. This changes how Revit calculates the bounding box.
Key steps
• Edit the tag family
• Select labels such as room name or area
• Enable Exclude from leader outline
• Reload the family into your project
Result
• Cleaner and more predictable leader placement
• Leaders attach to the most relevant part of the tag
• Improved drawing consistency across your project
Method 2 Fine Tune Leader Placement
If you need more control, this method allows precise adjustments.
What you can do
• Unclip the leader start point
• Move it freely anywhere on the tag
• Snap to edges or corners for accuracy
Extra tip
Enable Leader Snap Reference inside the family to create snap targets.
Result
• Full flexibility in leader positioning
• Ability to align leaders perfectly
• Better visual clarity in complex drawings
Why This Matters
Improving tag leader placement is not just about aesthetics. It has real impact on your workflow.
• Makes drawings easier to read
• Reduces coordination errors
• Saves time on manual adjustments
• Creates a more professional output
These small improvements add up quickly, especially on large projects.
Who Should Use This Technique
This workflow is useful for:
• Architects working on detailed plans
• Engineers coordinating complex models
• BIM specialists improving documentation standards
• Anyone who wants cleaner Revit drawings
Final Thoughts
Once you understand how Revit handles tag leader start points, you can take full control and avoid frustrating results. If you want to see exactly how to apply these techniques step by step, watch the video above and try it in your own project.
For more Revit tips and BIM workflows, explore the rest of the site and keep improving your efficiency every day.