3 EASY STEPS TO SCHEDULE REVIT OBJECTS BY LINKED ROOMS
Revit links just don’t play well with room schedules, if at all. The good news is you can still schedule Revit elements by rooms from Revit links, and it can be much easier and faster than you think.
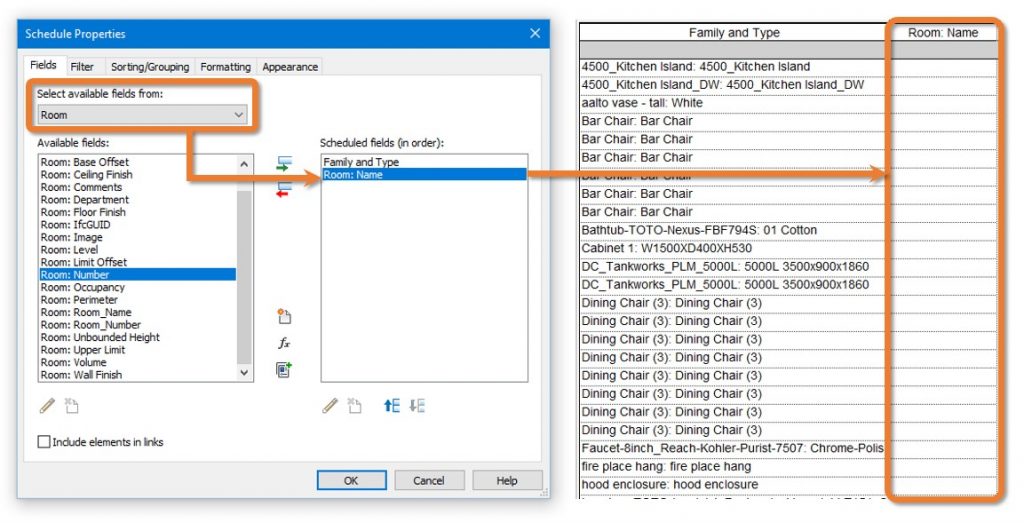
If you’re reading this, you have probably realised that when you have Revit elements in one model and Revit rooms in another, the connection between them is broken. This is why when you create a Revit schedule, choose to “Select available fields from room”, and add your usual favourite room parameters, they all come out empty!
It’s easy to see this as a limitation of Revit, but we also need to acknowledge that Revit actually needs more input from us to specify from where in which links should it get room information. Things like phases of rooms, room locations and the existence of the required room parameters are all Revit needs to know. With a way to specify these criteria, we are left with blank schedule cells. Well, only until now!
We frequently encounter this room linking issue, and it has become quite mundane to manually copy room parameters from several Revit links to a custom parameter in our main model to get this task done. To not become insane from Copy & Paste, we have developed the 3-step work flow below to simplify this whole process and make scheduling Revit elements by linked rooms a breeze.
STEP 1: CREATE CUSTOM SHARED PARAMETERS IN THE REVIT MODEL
You probably know this step already, but here it is for completeness. Since we can’t use parameters from “Select available fields” in the previous screenshot, let’s first create similar ones as shared parameters.
Go to Manage > Shared Parameters:

Check to make sure the active shared parameters file is the one you want to use for this exercise. If not, click Browse to select the correct one.
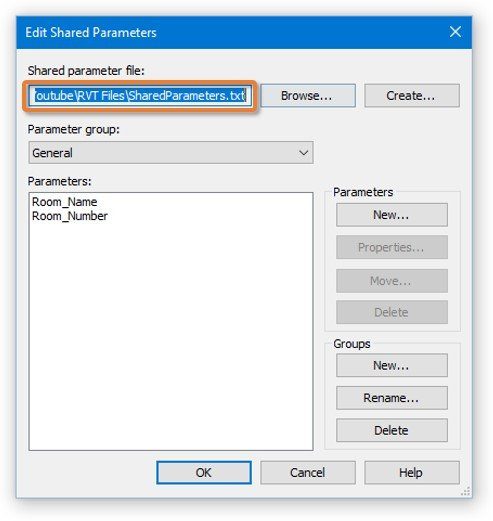
Next, make sure there are text parameters you can use to get room information from your Revit links.
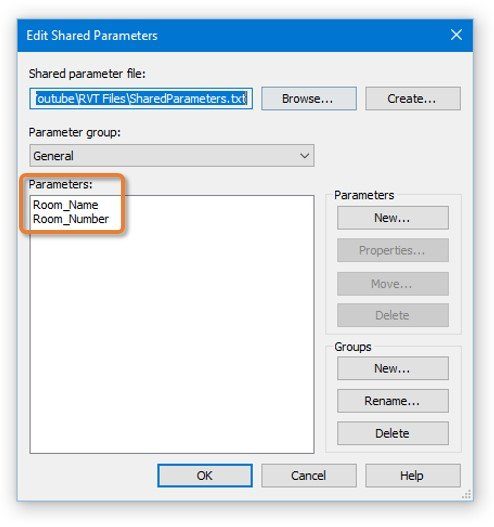
If not, click New to add one. Specify it data type as Text as showed below.
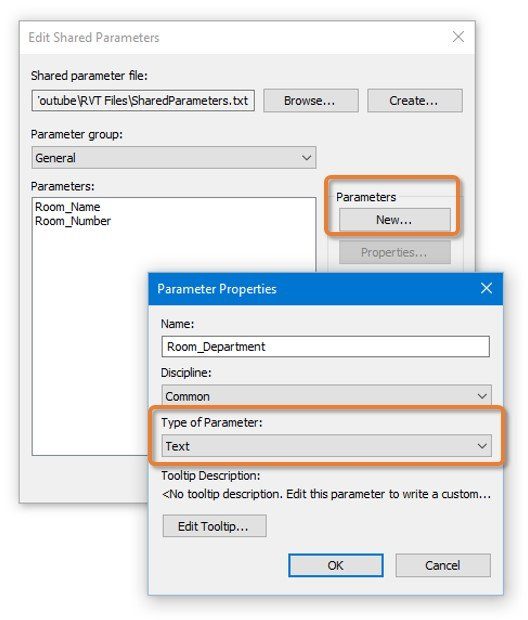
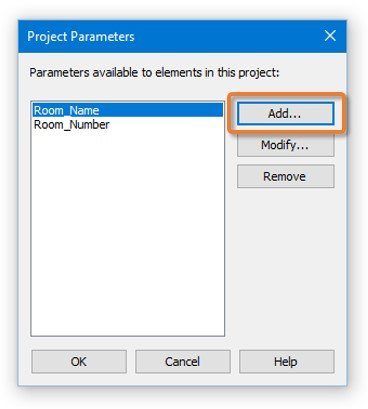
Click OK when done, then go to Manage > Project Parameters.

We need to bring in parameters created in the previous step, so click Add.
Choose to use a Shared Parameter, click Select to open the parameters file, the use parameter group and parameter name to locate the one you need, for example “Room_name”, then click OK.
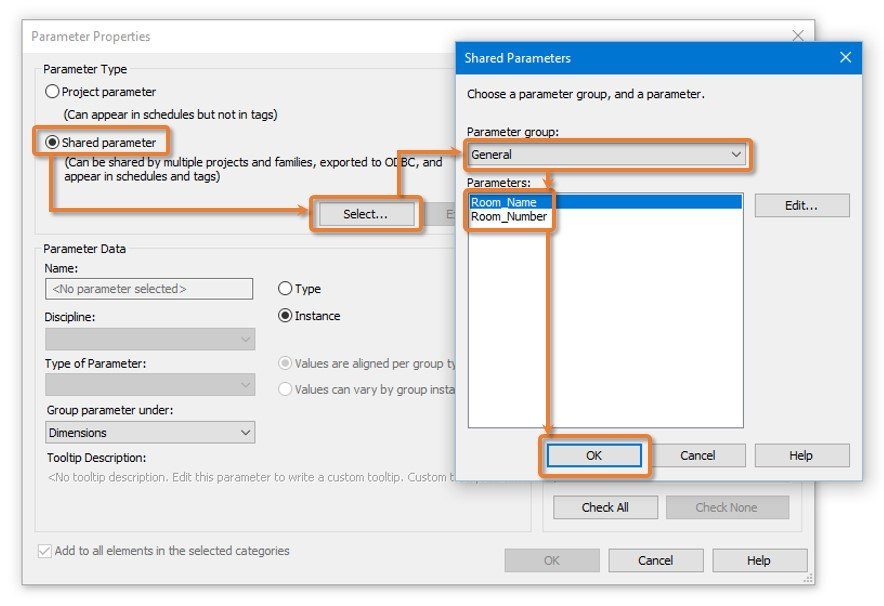
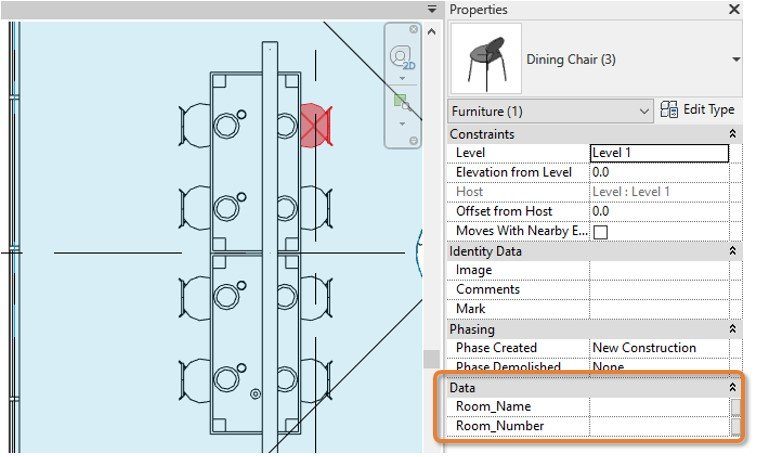
Make sure the set the parameter to “Instance”, because each Revit object in the model can have a different room associated to it. Next, select which Revit categories this new parameter should apply to. You can choose here only those you know will be needed, such as Furniture, or click Select All to get them all. Click OK afterwards to add this new shared parameter to your project model.
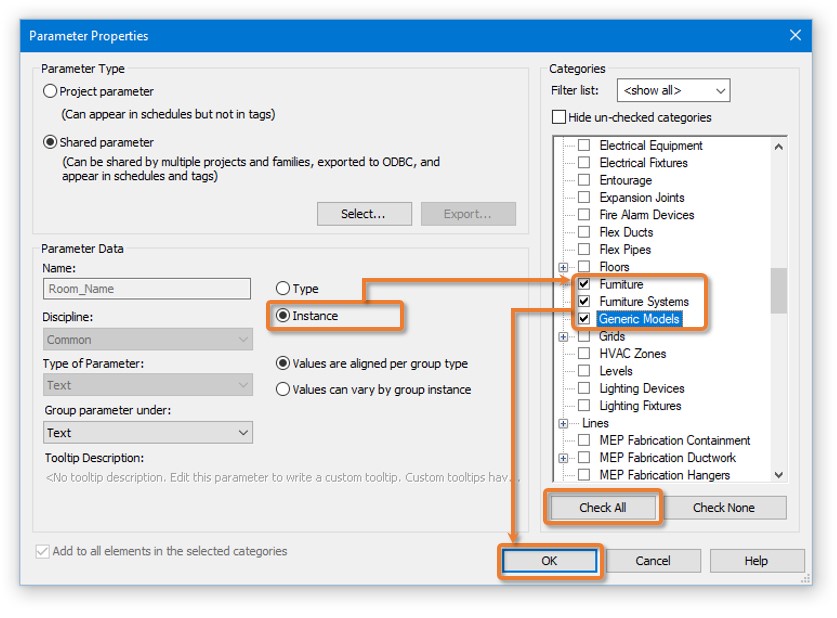
Select any Revit elements of a selected category in the previous step, and you will see the new parameter under its Properties. Repeat until you have all required parameters for room information added. For now, let’s just have Name and Number.
STEP 2: LOAD REVIT LINK CONTAINING ROOMS
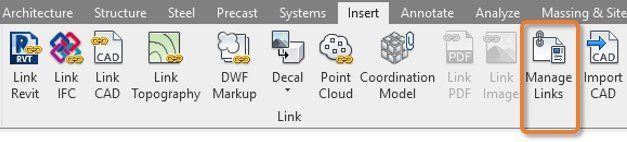
Now that we have the parameter ready to receive room information from Revit links, let’s actually make sure these links are loaded! Simply go to Insert > Manage Links:
If there’s any link which contains rooms you want to get information from, but its status is Not Loaded, select it here and click Reload.
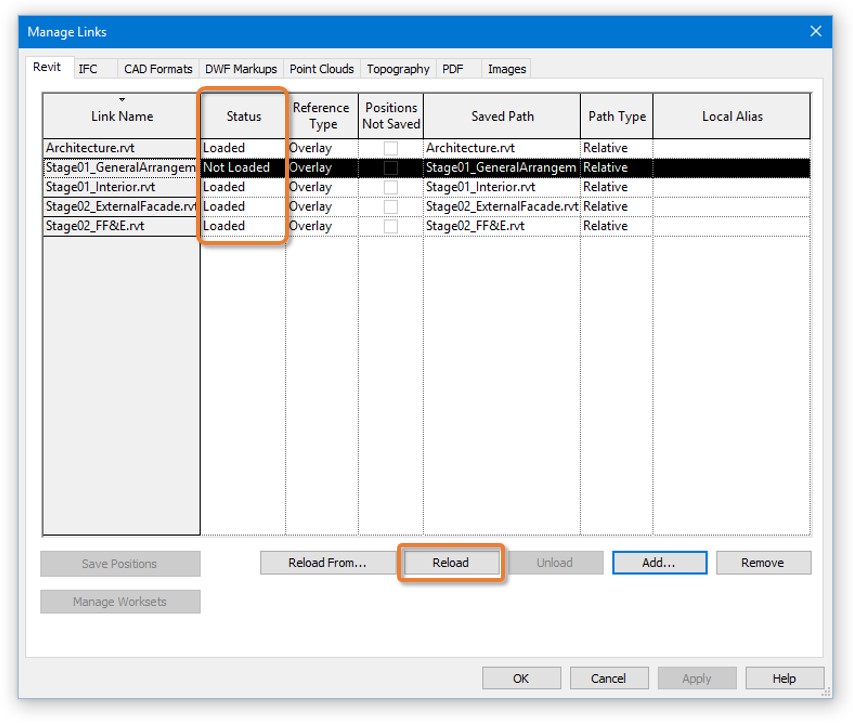
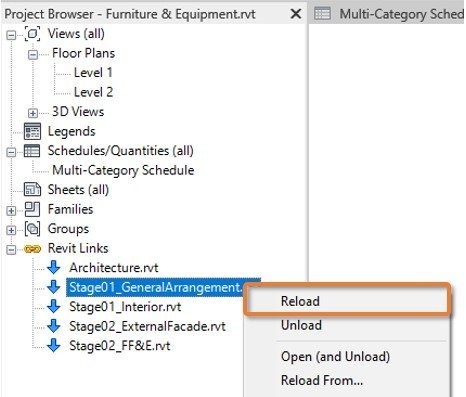
You can do the same by right-clicking a link under the Project Browser and choose Reload. Repeat this step until all links containing required rooms show blue arrows.
STEP 3: RUN RV ROOMLINK
Here’s when it gets interesting. Instead of manually copying room data from Revit links for each and every objects in the main model, we will use RV RoomLink to do that automatically. If you haven’t got it, click here to get a completely free trial version.
Once you have installed RV RoomLink, simply open Revit and launch it from the Add-Ins tab:
The user interface leaves clear clue on how you can set up this room data sync for success. Let’s quickly walk through these steps.
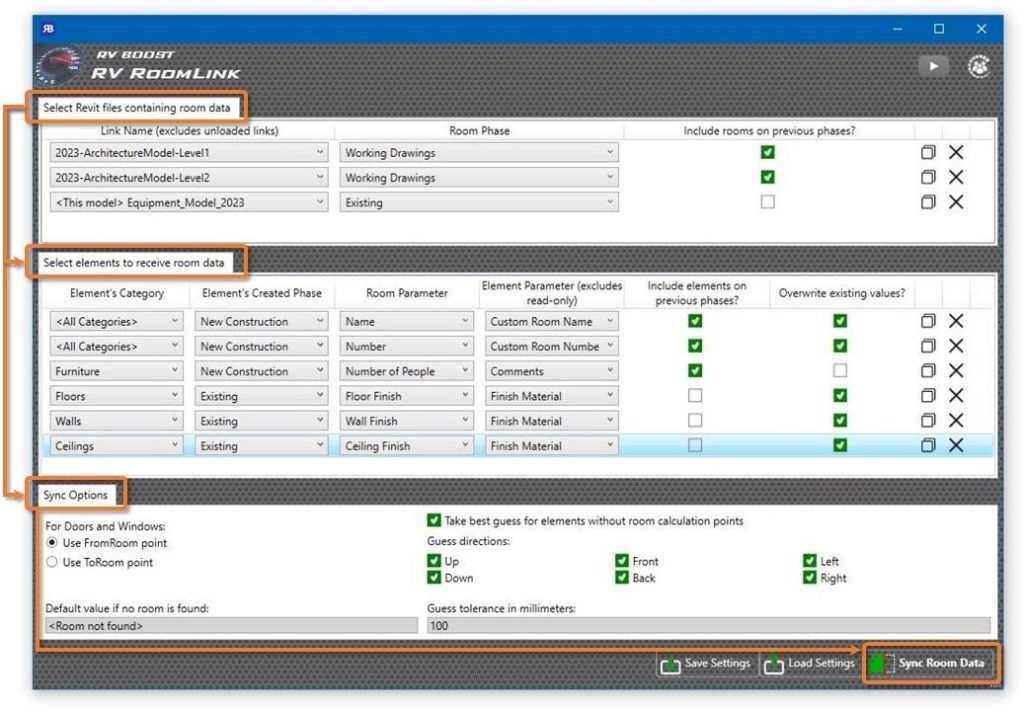
A- SELECT REVIT FILES CONTAINING ROOM DATA
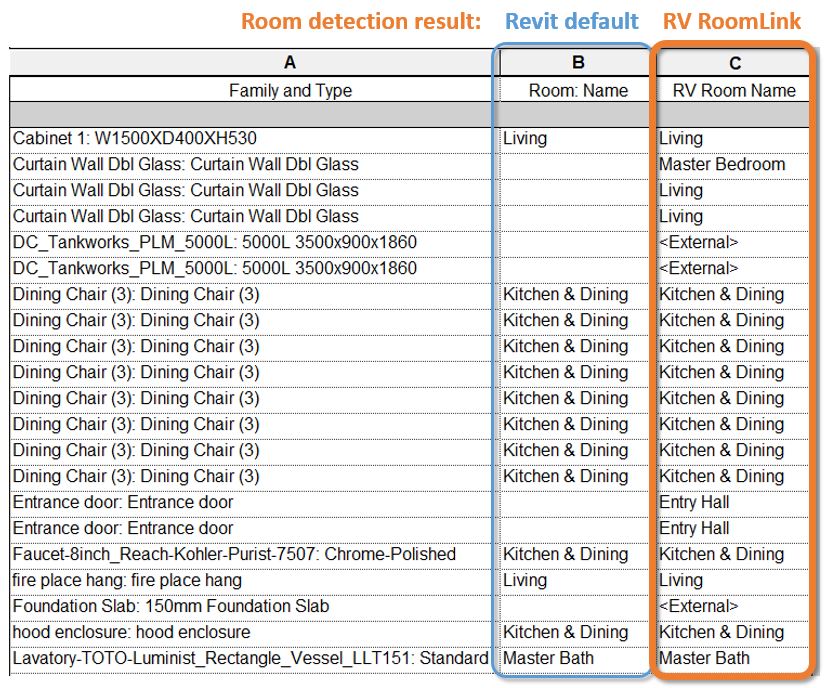
Noticed how it says “Revit files” instead of just “Revit links”? This is because you can also just select the first item here, marked as “<This model>”, to get data from rooms in your current model. If you do this, it’s similar to what Revit can do by default, but RV RoomLink’s smart room detection techniques will capture more room data than normal for you:
Anyway, the real power of this addin comes when you can now select any loaded Revit links which contain rooms you want to get associated with elements in your main model. This gives you lots of flexibility to decide on the best way to structure your BIM projects into different Revit models. No more copying rooms between files just to get room detection to work. Your rooms can now live in any Revit models, because all can come together here in RV RoomLink:
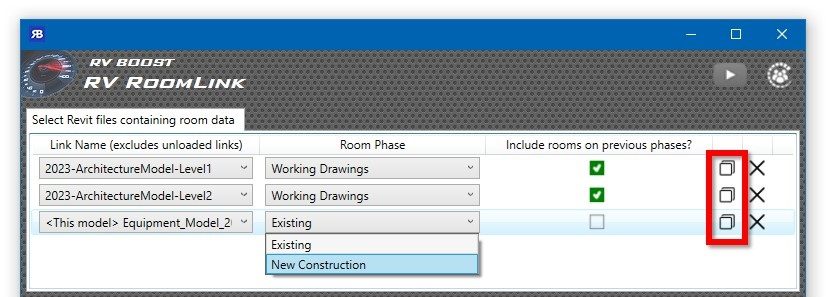
The Duplicate buttons highlighted above lets you copy existing link “bridges” to create new ones. You can have as many link bridges as you need to include rooms from all required links and phases.
B- SELECT WHICH ELEMENTS SHOULD RECEIVE ROOM DATA
Here comes another superpower! From thousands, if not more, elements in your Revit mode, you can select precisely which of them should be involved in the upcoming room check.
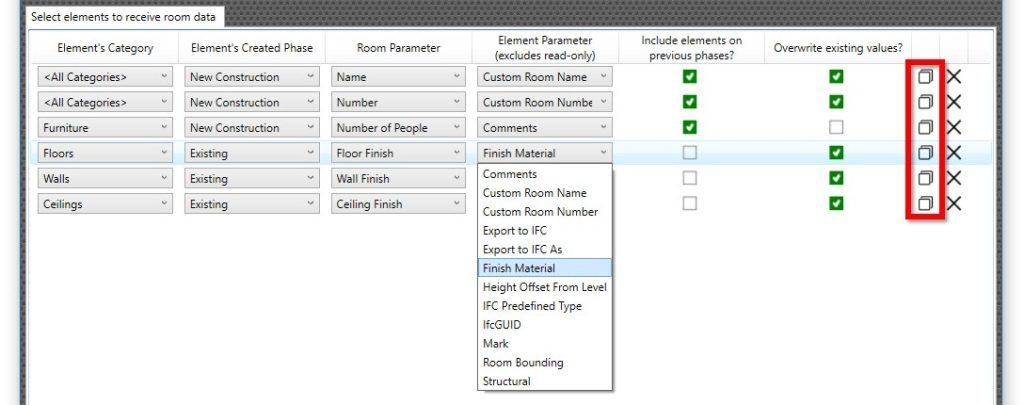
RV RoomLink offers you 3 ways to do this:
- From the same drop-down menu, select “<All Categories>” to include any elements in the model, or
- Select some elements before running RV RoomLink, then choose “Only selected elements” from the “Element’s Category” drop-down menu, or
- Select from the same drop-down menu the categories should have all their elements participate this this upcoming room check. You can use the Duplicate buttons highlighted above to copy existing parameter links as many times as you want to include all your required element categories.
Each parameter link in this section will then let you select the Created Phase of required elements, the room parameter to copy data from, and the element parameter to copy data to. Additionally, you can:
- Tick the “Include elements on previous phases” box to also update elements created before the phase specified in each parameter link,
- Tick the “Overwrite existing values” to update parameters already has values with the latest room data.
C- SET SYNCING OPTIONS
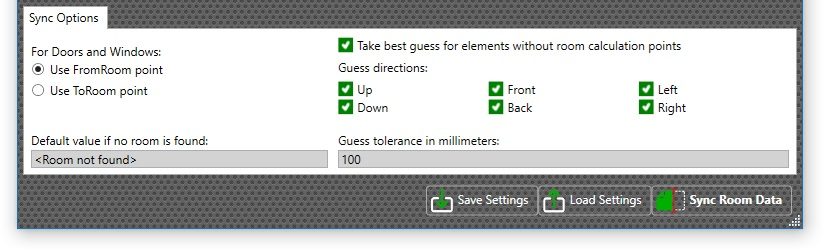
In this third step, you can either leave the default settings, or customize them to suit your Revit project.
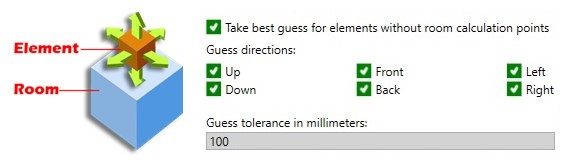
- Takes Best Guess for Elements without Room Calculation Points: Remember this point in the family editor? Revit room detection works best when all families have this point enabled. However, that’s not a small tasks if you have 500 families needing this special treatment! If you choose to use guess points here, RV RoomLink will dynamically analyse each family instance’s geometry, construct this room calculation point temporarily, and use it for best room detection result.

- Guess Tolerance in mm: When constructing temporary Room calculation points, RV RoomLink will use this tolerance value to offset them a small amount from their main position. This means room detection will be able to work with elements lying just slightly outside their rooms by a small distance. For example, a light switch sitting 20mm outside of room will know where it belongs if you set this tolerance to something bigger, such as 50mm. Be cautious though, because setting this value too high will obviously give inaccurate room detection results, especially where you have many rooms in a small area.
- Guess Directions: These are the 6 directions that RV RoomLink will look at when applying the Guess Tolerance value above. You can choose to use all, some, or none of them,
- For Doors and Windows – Use FromRoom/ToRoom Point: Doors and Windows want to be special, so they have not just 1 but 2 different room calculation points: 1 for a room they open from, and the other for a room they open to. With this option, RV RoomLink lets you specify which room to copy data from, because many of your doors and windows will have both From room and To room.

- Default Value if No Room is Found: exactly what it says, this is for you to specify what to write to the selected element parameter if the object doesn’t sit in any room. This can be a canopy outside the building, or a chimney for example, so we usually set this to “<External>”. If you leave this box empty, no value will be used.
D- PRESS SYNC!

You will like how quickly RV RoomLink detect rooms from lots of Revit links. Whenever your models have changed significantly, simply repeat step A to D and let RV RoomLink recreate the room data link. Each time, RV RoomLink will provide the report above to show exactly which elements were updated and which ones it couldn’t find a room for. The 2 highlighted buttons then let you quick see in the model any selected element in the report.
Think about how many hours you and your team will save by offloading this mundane task to RV RoomLink! To start saving right now, simply click below to access a completely free trial of this handy app:
Still not convinced? See below RV RoomLink in action: