
12 Simple Tricks to Reduce Revit File Size!
Bloated file size has always been a problem with large Revit projects. There are several methods for trimming a Revit file to its essentials and reduce file size. However, some are hard to remember, while others are too time consuming to be practical on big projects. Until now.
Below you will find the complete list of everything you can practically do to make your Revit model light and snappy again. You will also see exactly how to carry out these fixes yourself. Let’s get going!
PURGE UNUSED (Obviously…)
Of course, this command finds almost everything not in use in the model and let you delete all or some of what found. No secret here, but you will be amazed how we sometimes neglect doing Purge Unused on Revit files. This can be because some of us are afraid of losing families we loaded into the models for “later use”, or the project just has too many Revit models that purging each one frequently has become a huge task. To this, we have two recommendations:
- Don’t keep things in the model for later use! This is where we need to choose performance over convenience. Instead, save all Revit families you think you will need in a common project library. This can be a good old folder on the network, or a dedicated Revit file, both of which should be accessible by all members on your Revit team.
- Regarding having too many Revit files to Purge, simply allow everyone working on any file to do Purge Unused on the model they work on. Too often, this task is reserved to the BIM Manager or BIM Coordinator. When there are too many Revit files to manage, they become the bottleneck. Letting all Revit users do Purge Unused should solve this problem.
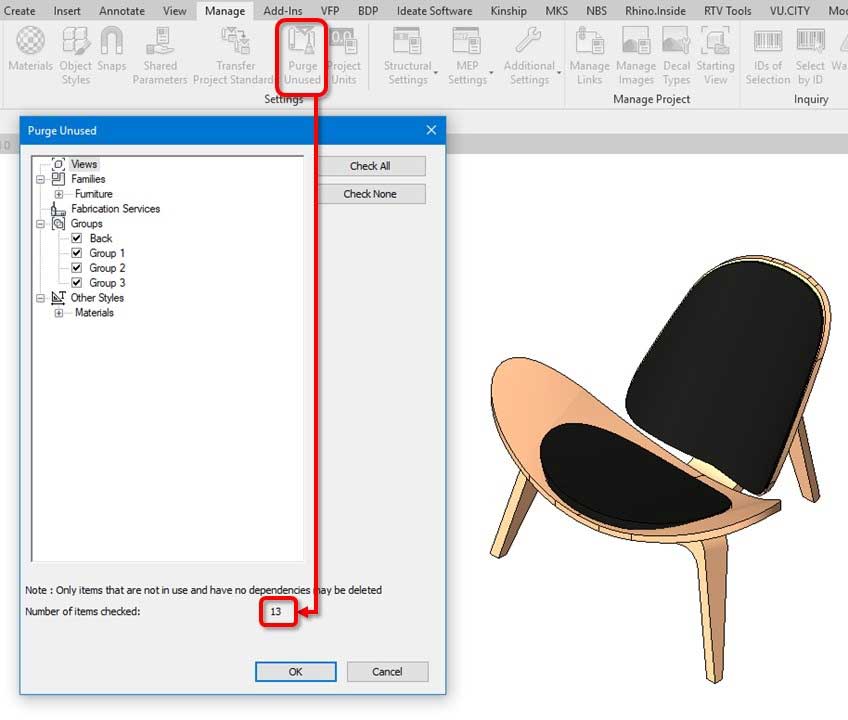
So with that out of the way, you can now confidently go to Manage > Purge Unused. Select everything it shows, and click OK.
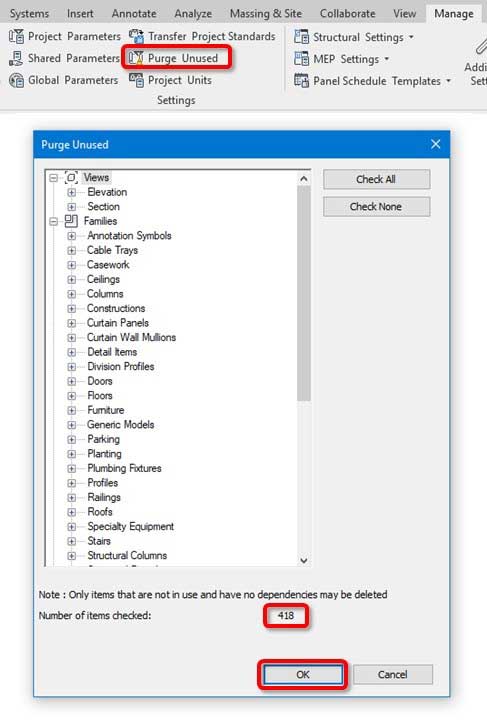
Is that all? Not quite! Note that certain Revit elements can only be purged once there are no elements depending on them. If the first Purge Unused you just did deleted some Revit families, these may have left behind other things they referenced such as materials. To remove any of these materials that now has become redundant, simply do Purge Unused one more time:
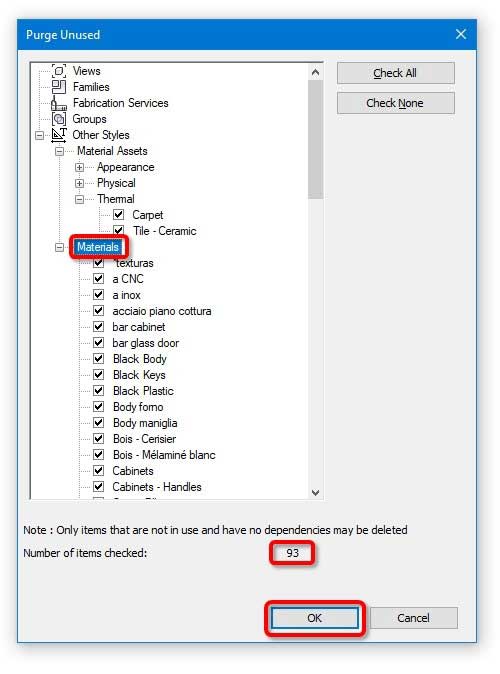
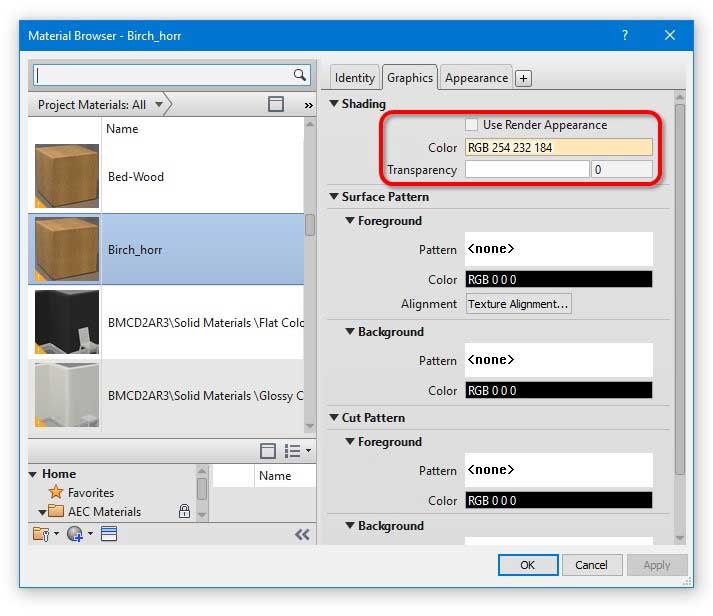
Are we done here? Almost! You will need to purge one more time, because materials also have dependencies. What do materials reference you may ask? It is something called Material Assets. Think about them as families and types, concepts you are probably more accustomed to. Just like a Revit family, a Material Asset holds certain definitions, such as physical and thermal properties. A material then uses one of the available material assets, with some added “instance” parameters of its own such as name, transparency and shading colour.
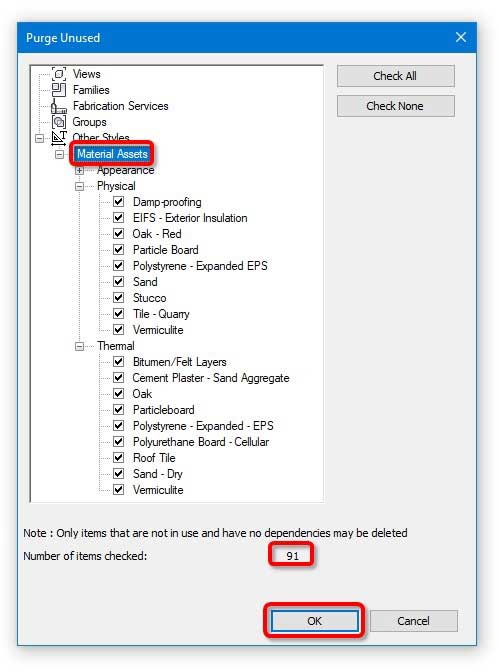
As a result, certain material assets only become redundant once all materials depending on them have been deleted. If that happened in your last Purge Unused, you will now need to repeat the command to purge these obsolete material assets:
After 3 purges, Revit has removed most of unused elements from your model. We said “most”, because there are other redundant elements you will also need to delete. Read on to find out what they are.
DELETE UNUSED CAD FILES
We wrote in a previous blog post on why CAD files are toxic to Revit, and how to quickly find and delete them. All still holds true. If you need to brush up on this topic, revisit that blog post here.
In a nutshell, check two places below to delete any DWG objects you no longer need:
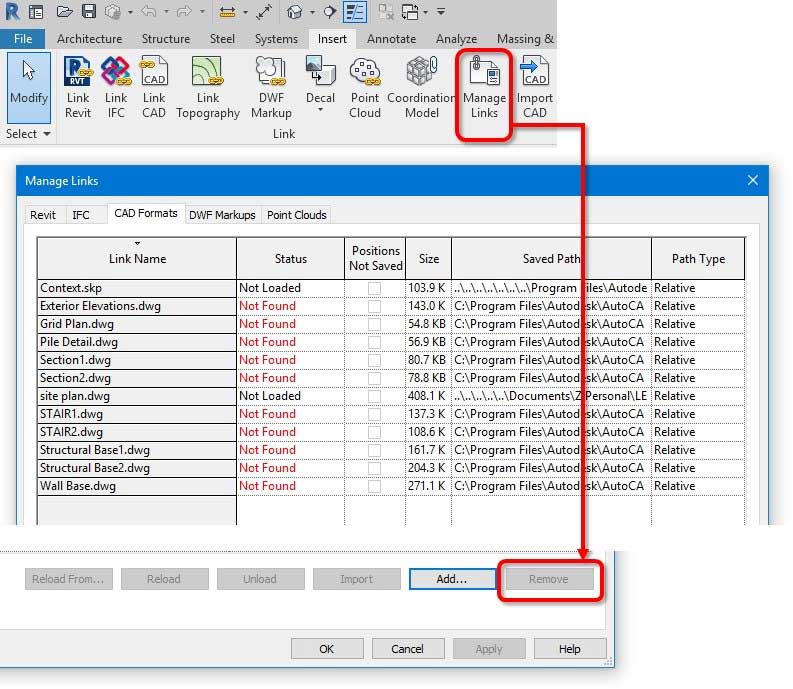
- For linked CAD files, go to Manage > Manage Links > CAD Formats. Yes, it’s plural because not only DWG but other CAD file types such as DGN, SAT or SKP may also have clustered up your model. In this window, simple select files you no longer use and click Remove.
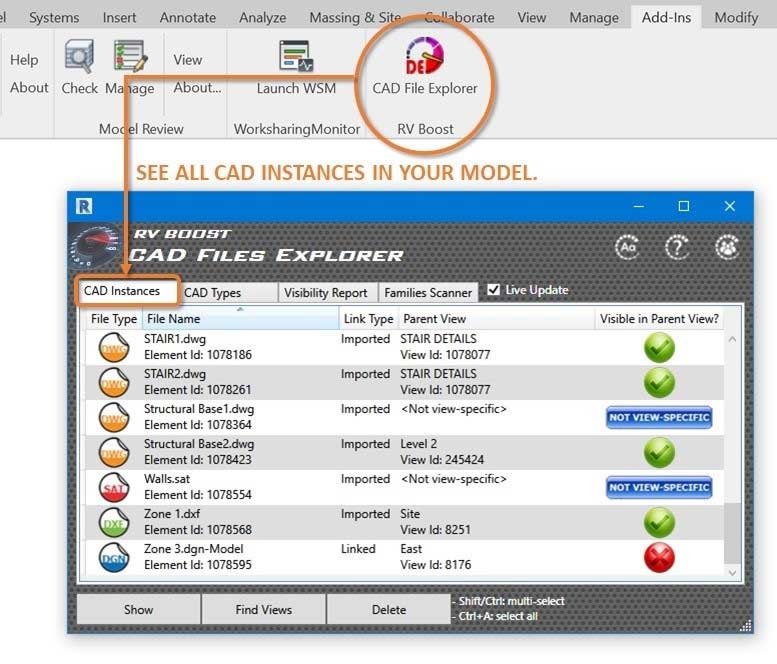
- For imported CAD files, Revit doesn’t show them all in one place like with linked ones, so you either need to find them by manually checking all views and sheets in your model, or use CAD Files Explorer. This Revit addin is your best bet when it comes to quickly finding DWG and all other CAD file formats in the whole model, checking if each one is still in use, and deleting all those unused in a few easy clicks. Click here to for your free copy of CAD Files Explorer.
LINK CAD, DON’T IMPORT
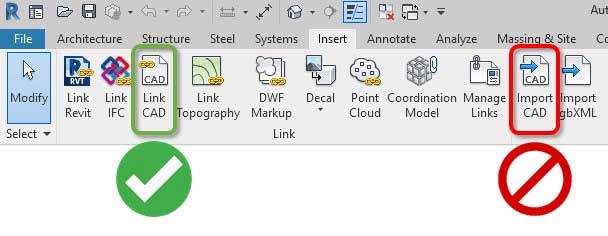
The nest best thing for Revit file size after deleting all DWG files from the model is to replace them with CAD links. As a rule, always think twice before hitting that Import CAD button. Most of the time, linking is the better option because it won’t embed the CAD information into your model. On the other hand, Importing binds the DWG into your model, and increase the Revit file size by roughly the same amount of the DWG file.
Another variation of Importing CAD you should also avoid is importing DWG files into a Revit family and then place this family in the model. This is slightly better than importing it directly into your main model because it keeps any extra DWG information like line and hatch styles contained in the family. At the end of the day however, the family becomes part of your main model, so your Revit file size will still increase by the same amount, if not more!
CLEAN ALL LOADED FAMILIES
Families are the backbone of any Revit model. We certainly don’t want to weigh it down with implants or foreign parts, such as imported 2D or 3D DWG files. Not only will this make your Revit model run slower, the file size will also increase rapidly.
Because we usually have lots of families loaded and in use in a model, the strategy for sorting them out is definitely batch-processing. While Revit currently doesn’t provide a way to process families quickly, there are good plugins taking care of this big task for you.
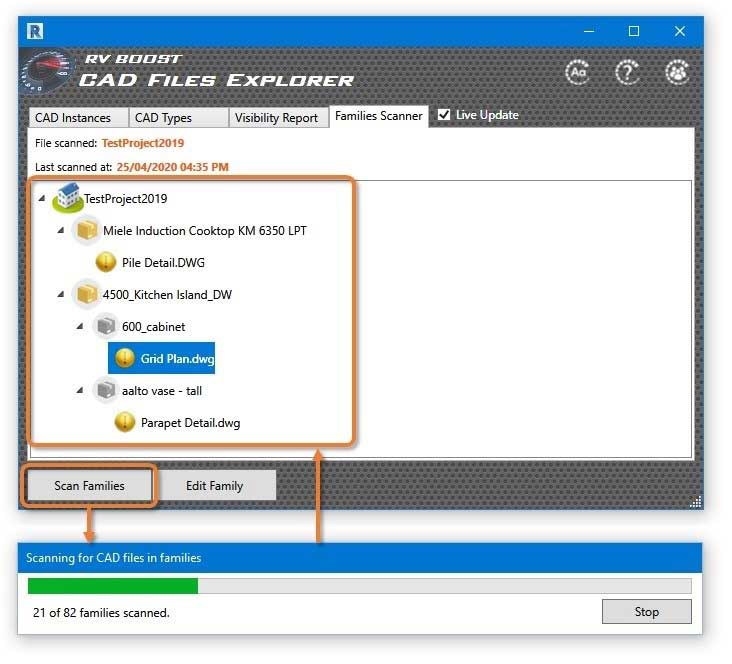
The first one, CAD Files Explorer, allows scanning all families loaded in your project to find any CAD or DWG files in use. It checks all families including nested ones no matter how many nesting levels deep. As a result, you will clearly see which family or nested family contains foreign objects. This makes it easy to then open respective families and remove CAD objects or replace them with native Revit geometry.
The second add-in essential for this task is RV FamilyPurge. Remember that Purge Unused command we used in the main Revit model? We can run that same command in Revit families to clean up anything redundant:
Straightforward isn’t? Not quite, if you have hundreds of families to clean. If many of them have nested components, the number of families to process this way can easily double! The smarter solution here is to use RV FamilyPurge. It will perform Purge Unused in any number of families you want, including nested components down to the deepest nesting level, reload each family back to their host, and reload top-level families back to your project.
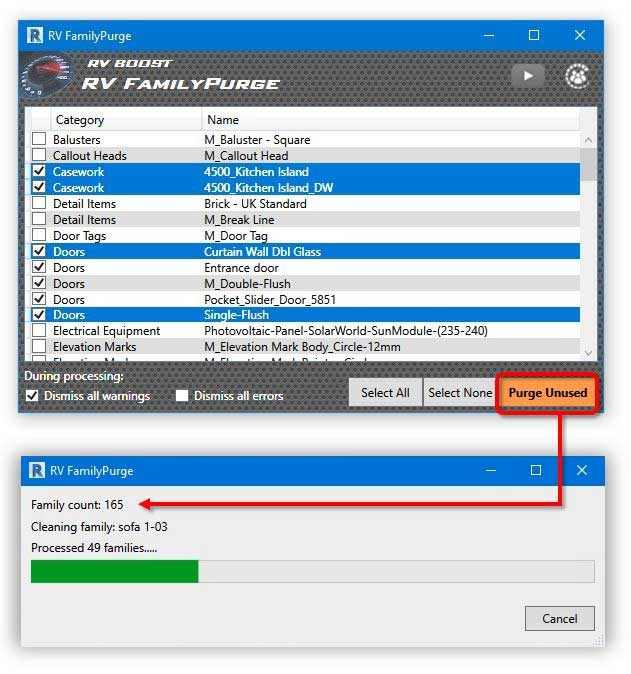
Once the 1-click process is complete, simply do Purge Unused 3 times in your main model, because of reasons we explained previously, and see your Revit file size really drops!
REMOVE UNUSED ROOMS, SPACES AND AREAS
Revit rooms, spaces and areas love you too much and really want to be part of your project! That’s probably why when deleted, they will still hang around in the model, in case you fall back in love with them and want to place them back.
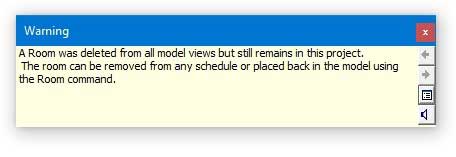
There’s of course an advantage of this system, which is when you reuse a previously deleted room, space or area, all its properties and attributes will still be there. But what if you really want them gone to save a Revit model now close to 1 GB big?
Fortunately, that’s easy to do. Simple create a new room, space or area schedule. We would recommend including in this schedule the Area parameter, and then use it to sort the schedule. Any room, area or space previously deleted will show “Not placed” under the Area column. At this point, select lines for all unplaced rooms, and click Delete on the ribbon.
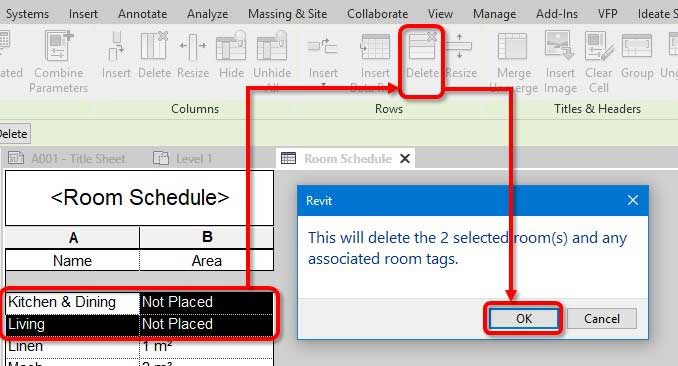
Apparently, file size reduction from doing this will vary, depending on how many unplaced spatial elements you have in the model.
REPLACE OR EXPLODE GROUPS
Most experienced Revit users have a love–hate relationship with groups. Yes, groups are good for making quick collections or copies of objects. However, they can make your Revit models much bigger than it should be if used incorrectly. Let’s consider two scenarios:
- We create a group of 10 elements and copy it 30 times. This adds 300 object definitions to the model.
- We create a family which contains the same previous 10 elements, load it into our model, and place it 30 times. This only adds 10 object definitions to your model, because all 30 instances of this family share the same 10 definitions.
If you had followed scenario 1, all is not lost. Simple select all 30 groups and Ungroup them. Doing this reduces the number of group definitions Revit needs to hold and cut down its file size.
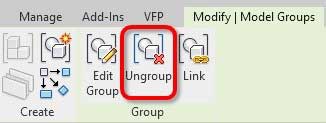
Alternatively if you still want to ensure they remain 30 identical sets of objects, simply create a family as in scenario 2, and then replace your groups with instances of this family.
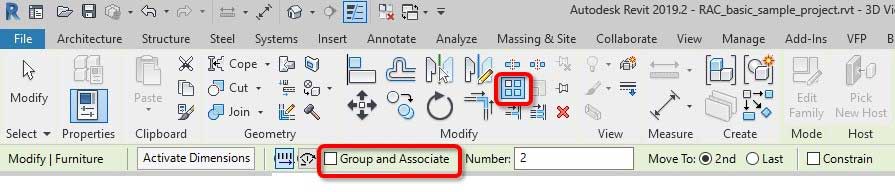
Also, a common reason we end up with lots of groups in the model is from the use of object arrays. To prevent this, simple disable the “Group and Associate” option whenever you create an array.
REMOVE OBSOLETE DESIGN OPTIONS
Design options is another Revit feature that can harm your model file size and performance if used incorrectly. The key is to make sure they are temporary. This means as soon as you have decided on one desired option, always make it Primary, and then do Accept Primary.
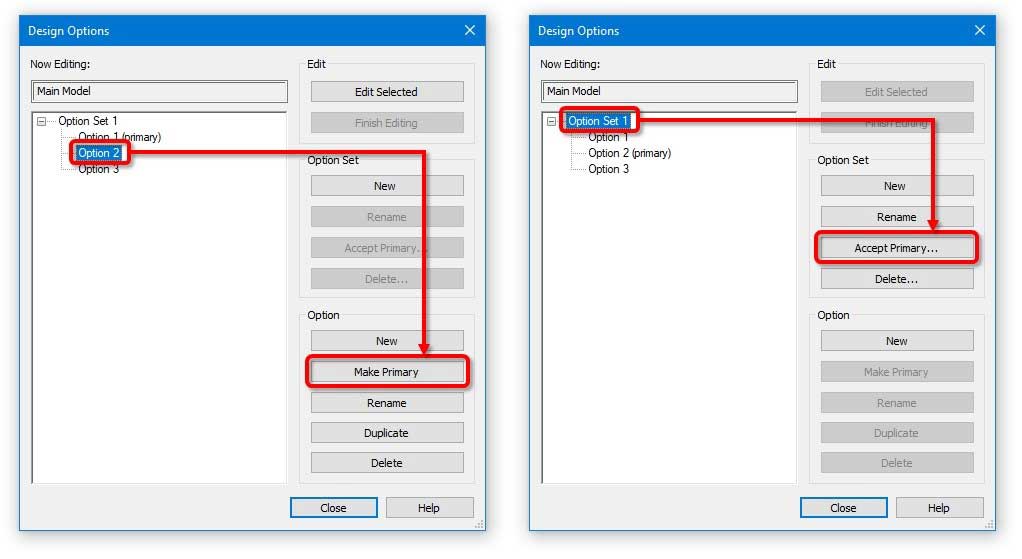
Failing to do this means you could have hundreds, if not thousands of alternative, invisible Revit objects which does nothing than slowing down your file and bloating your file size.
If you have strong preference for one design option but still don’t want to lose other ones, just make a backup copy of your model, and then do Accept Primary as showed above. This way if you want to return to one of the deleted design options, just open the backup file and copy elements back into your main Revit model.
DELETE UNUSED VIEWS & SHEETS
This step will usually have the biggest impact on reducing your Revit file size, especially on big projects with lots of users working on the same Revit models.
Revit encourages us to create 2D views, like sections and elevations, often to check how things we modelled in 3D would look on construction drawings, and vice versa. The flip side of this is without proper view management, the number of temporary or “Work In Progress” (WIP) views will quickly add up as your Revit file keep growing.

Even worse, when someone leaves the project team, their views will likely remain in the Revit model. Without knowing who created these WIP views, all other Revit users are afraid of deleting them. The fear of removing something others may need paralyses us all!
The solution has to do with workflow:
- Ask everyone to give descriptive names to any Revit views and sheets they want to keep. This way, you can delete views left with default names such as “Section 1” or “Drafting 1” at a later date, without calling 30 people to check if these views are still in use.
- Ask your team to include their names in any view they create, either as short initials in the view name itself, or in a view parameter instead. This makes it easy to find who created a particular view in the future and ask if they or you can delete it.
DELETE UNUSED VIEW TEMPLATES
Slightly related to the previous tip, this one ideally should follow right after you have deleted unused views and sheets. This is because if views you deleted used view templates, now is the perfect time to clean up these templates too!
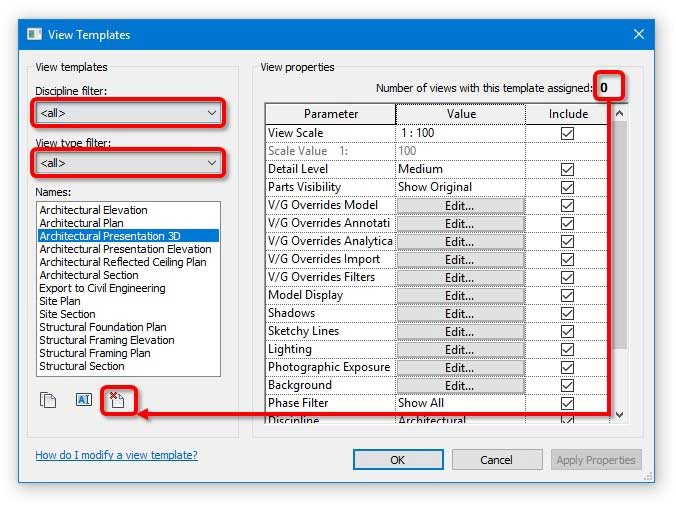
To start, open the Manage View Templates window:
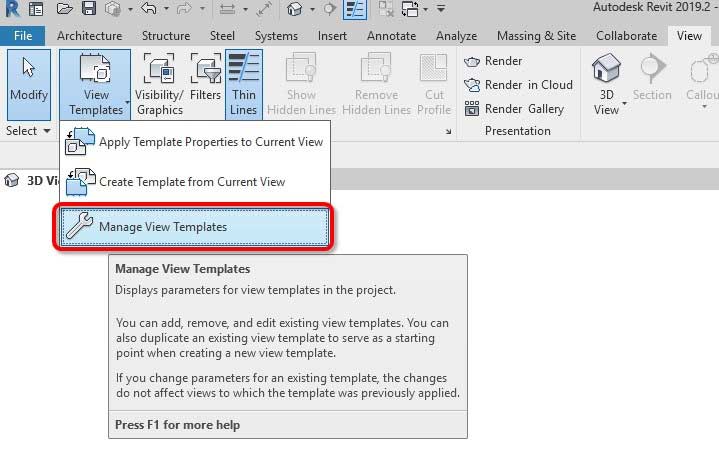
Next, set filters for both Discipline and view type to <all>. This is to show all view templates in the model. From here, you can click each template on the list, and check the “Number of views with this template assigned” value on the top right corner of the window. Whenever you see a zero, click the Delete button to remove that template.
PURGE OR RESIZE LARGE RASTER IMAGES
This usually becomes a problem when the model contains a large number of raster images, for example to show things like renderings on sheets in addition to model-based Revit views.
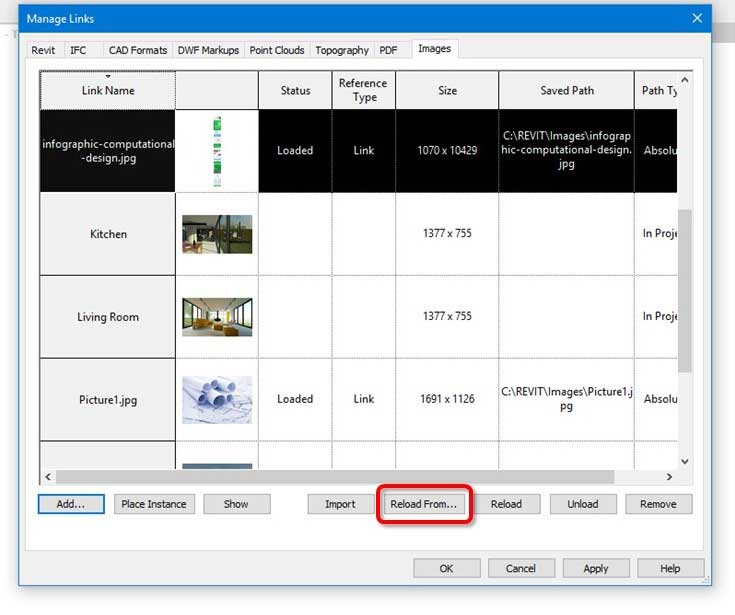
Firstly, take a look at all raster images in your model by going to Insert > Manage Links > Images (or Insert > Manage Images in earlier Revit versions). Pay close attention to the Count value of each one. If this shows as 0, you should select and delete it from your Revit file.
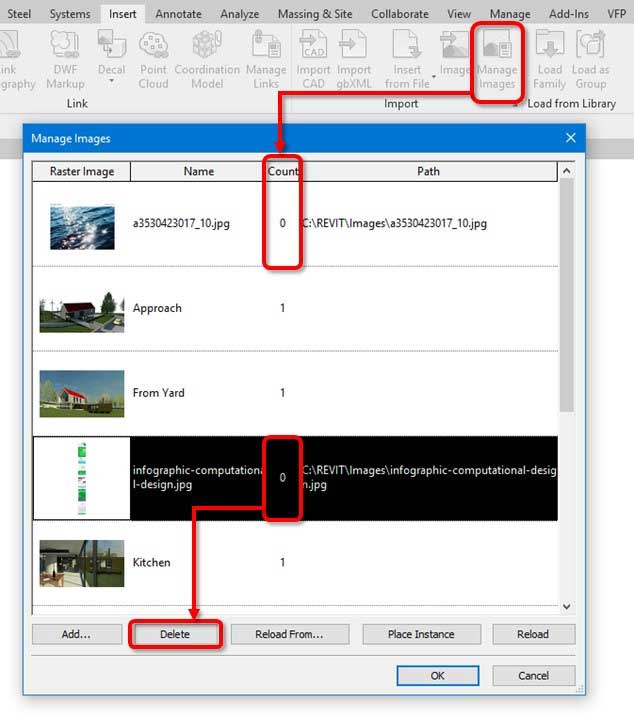
Secondly, look at the Size column. Revit does a good job in letting you scale and resize images inserted into the model. However, this will mask the problem of using unnecessarily large images. Revit will absorb the image’s file size into the model’s total size. Simply making it smaller in your views or sheets won’t make your files smaller.

Note that if on an earlier Revit version, you won’t have this Size column because previously, the Manage Images window was more basic. In this case, use this Revit plugin to export all material bitmaps from your project to a folder, then turn on the Dimensions column to view the same information.
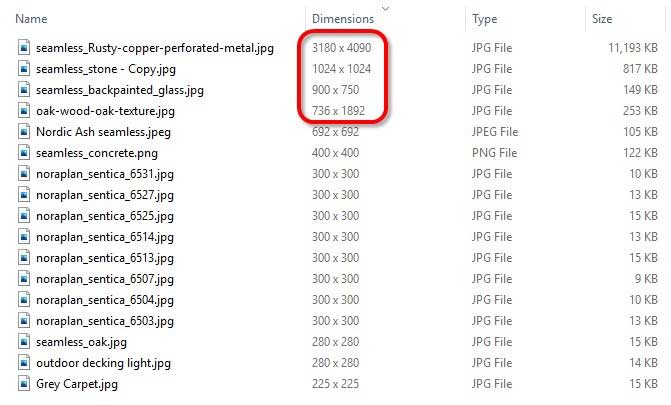
If you’re serious about optimising your Revit file size, the next step is replace any images of unnecessarily large dimensions. To do this:
- Locate the image in your folder or file system using the Path or Saved Path column in Revit’s Manage Images window
- Scale it down using any capable software, such as Photoshop or even MS Paint!
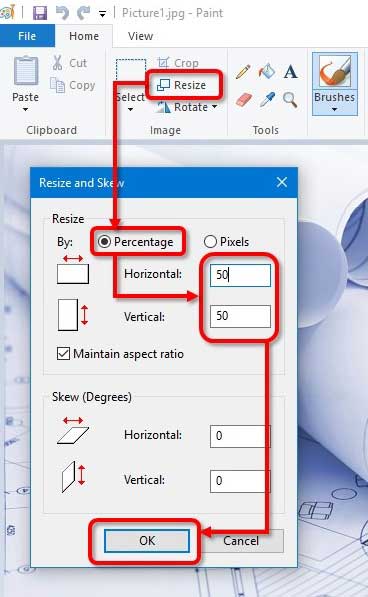
- In Revit, go back to Manage Links or Manage Images
- Select the image to be replaced, and click Reload From
- Browse to the scaled down version and click OK
- Rinse and repeat
REPLACE IN-PLACE COMPONENTS WITH PROPER FAMILIES
We have nothing against in-place components where they are absolutely necessary. However, you will rarely be able to justify their use except from modelling one-off occurrences of really complex geometry. Even when this happens, it’s a good idea to later on replace the in-place component with an external family with identical shape and properties.
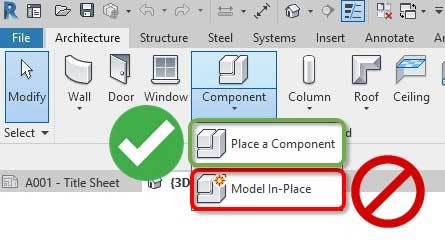
In terms of file size, in-place components is an issue, especially once you start copying them. If you place 10 copies of a Revit family loaded from outside the model, only 1 object definition is saved in your project file. This allows having the smallest file size possible.
In contrast, creating 1 in-place component and copying it 10 times will add 10 different object definitions to your model. This means the model has to get bigger to show the same geometry and data to you. To avoid wasting disk space storing identical object definitions like this, always try to replace in-place components with proper Revit families.
CREATE A MODEL CLEANING ROUTINE
You have probably realised by now that there are lots of steps involved in cleaning a Revit model. However, the bigger problem is remembering to do these cleaning tasks frequently every time your model gets big again. This is tricky as you don’t always have time for this kind of maintenance. What if you can combine all these steps into a model cleaning routine and run the whole combination of tasks with one single click whenever necessary?
Well, now you can with RV DeepClean! To find out more, check out the video below and get the app for free from here.
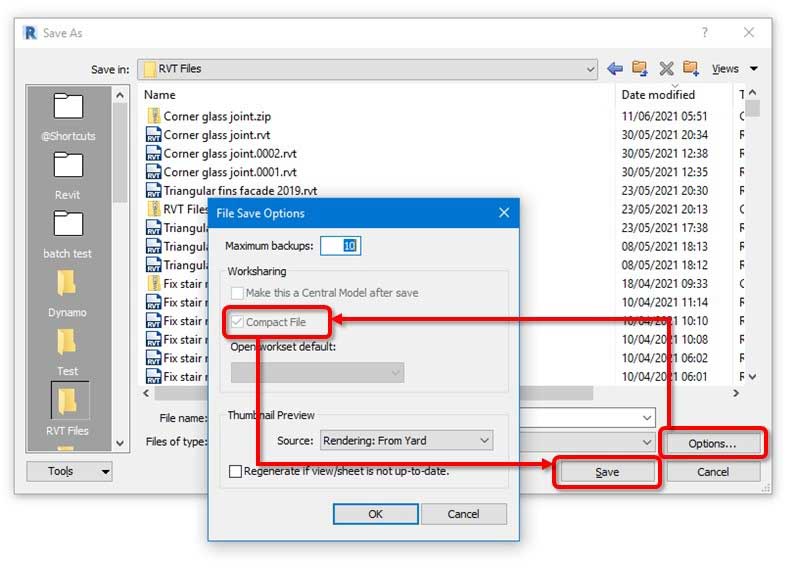
FINAL PURGE AND COMPACT-SAVE
If you have completed all the above, well done! At this point, we should do a final Purge Unused to remove anything which just became redundant after our previous steps. For example, if you have removed all instances of a group in the model, the group type can now be purged.
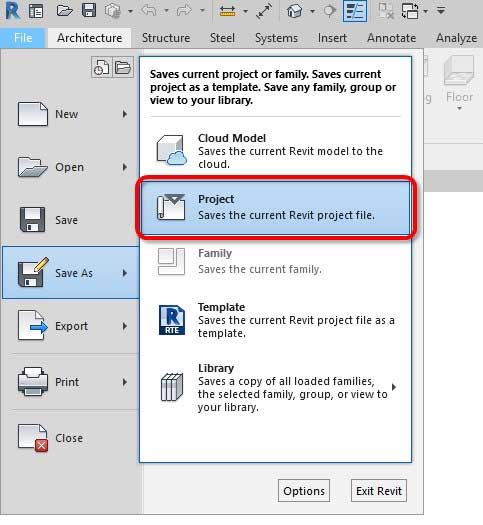
Finally, do a Save As with the Compact File option checked. This will ensure Revit recreate the file to contain only its core, essential data. Doing this allows the file size to reduce to the minimum.
NEXT STEP
Keeping file size of large Revit models under control takes discipline, and you’ll need to repeat all tricks in this guide as the project progresses. With tips and Revit plugins we introduced however, this hopefully should become a straightforward process. It’s never too late to revive a slow and sluggish Revit model!
Subscribe to our channel here for more tutorials like this every week!


How about deleting backup files that Revit creates for a project while keeping only the latest. If Revit has been set to create 9 backup files is it safe to delete all the older 8 files keeping only the lates
That’s a great idea. Thanks!
We’ll add it to the article and also as a new option in our Revit plugin: https://rv-boost.com/revit-plugins/rv-deepclean/